During my testing of the new Leica M Monochrom (Typ 246) in NYC and New Orleans, I was blown away by the camera's high ISO ability, so I wanted to see how it stacked up against the original M Monochrom based off of the M9, as well as the Leica M (Typ 240) when converted to B&W.
These kinds of tests are never easy or clear-cut and there were some obvious challenges. I’ll address these and how I decided to handle them.
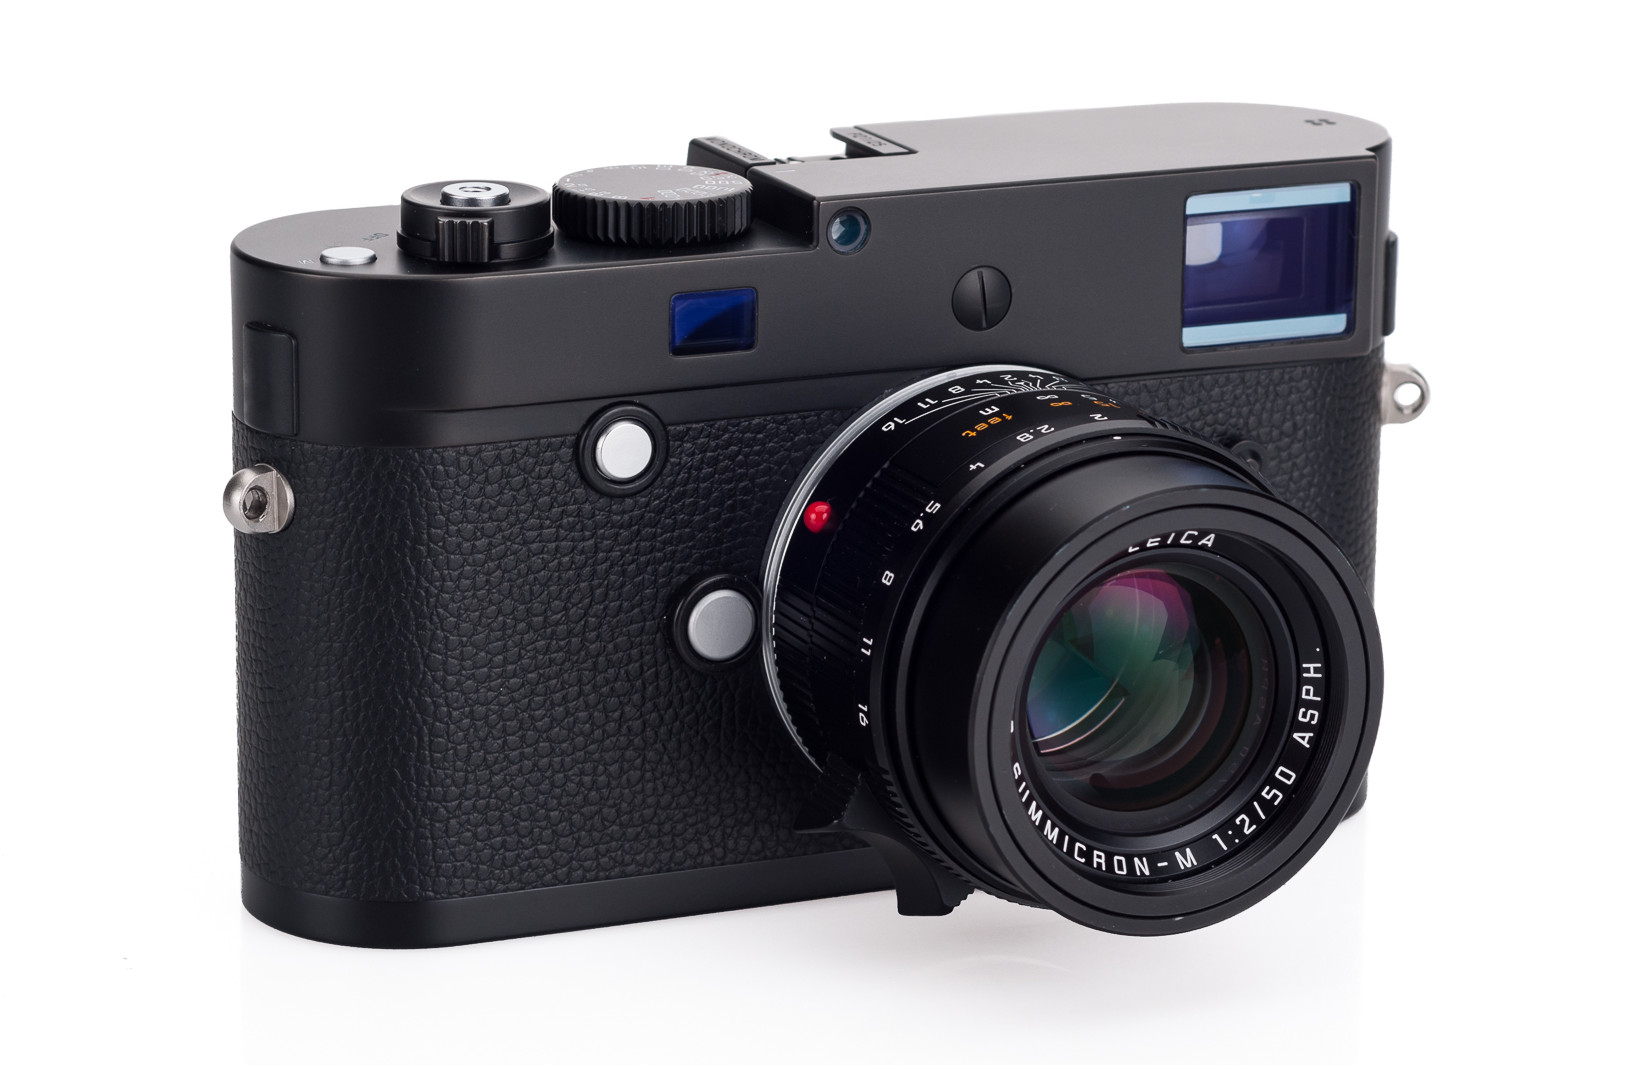
The Leica M Monochrom (Typ 246)
M Monochrom (Typ 246) vs. M Monochrom (M9)
There is a resolution difference between the earlier M9-based M Monochrom, which I'll refer to as the M9M, at 18MP, and the new M Monochrom (Typ 246), which I'll call the MM246, at 24MP. Others might have uprezzed the M9M up to match the MM246, but I feel this can actually have a detrimental effect on image quality as we'd be doing some non-integer scaling. Such scaling can create a loss of per-pixel acuity. Also, if you have read my thoughts on uprezzing before, you might recall that I'm not a huge fan, even when printing big. My preference is almost always to output files at native size and let the printer driver handle the scaling. So, I decided to leave each one in its native size. You’ll see the resolution difference in the comparisons. Please keep it in mind when making your own evaluations.
M (Typ 240) vs. M Monochrom (Typ 246)
The M240 is a color camera and color images converted to B&W don’t always translate to a monochrome capture, but I think you’ll find that my B&W conversion, the default one in Lightroom with some small tweaks, did a pretty decent job of matching the overall look of the MM246.
The M240 also tops out at ISO 3200 for its normal range, and up to ISO 6400 in the PUSH range. You'll notice as you look at comparisons higher than ISO 5000, I've used ISO 6400 on the M240. I could have deliberately underexposed once I hit the ISO wall on the M240 and pushed in LR to achieve higher “equivalent” ISOs, but I felt that most users would stay within the confines of the operating range. The same is true for the M9M, where the range stops at ISO 10000. For ISO 12500 and 25000, I used the ISO 10000 export.
The Test Setup
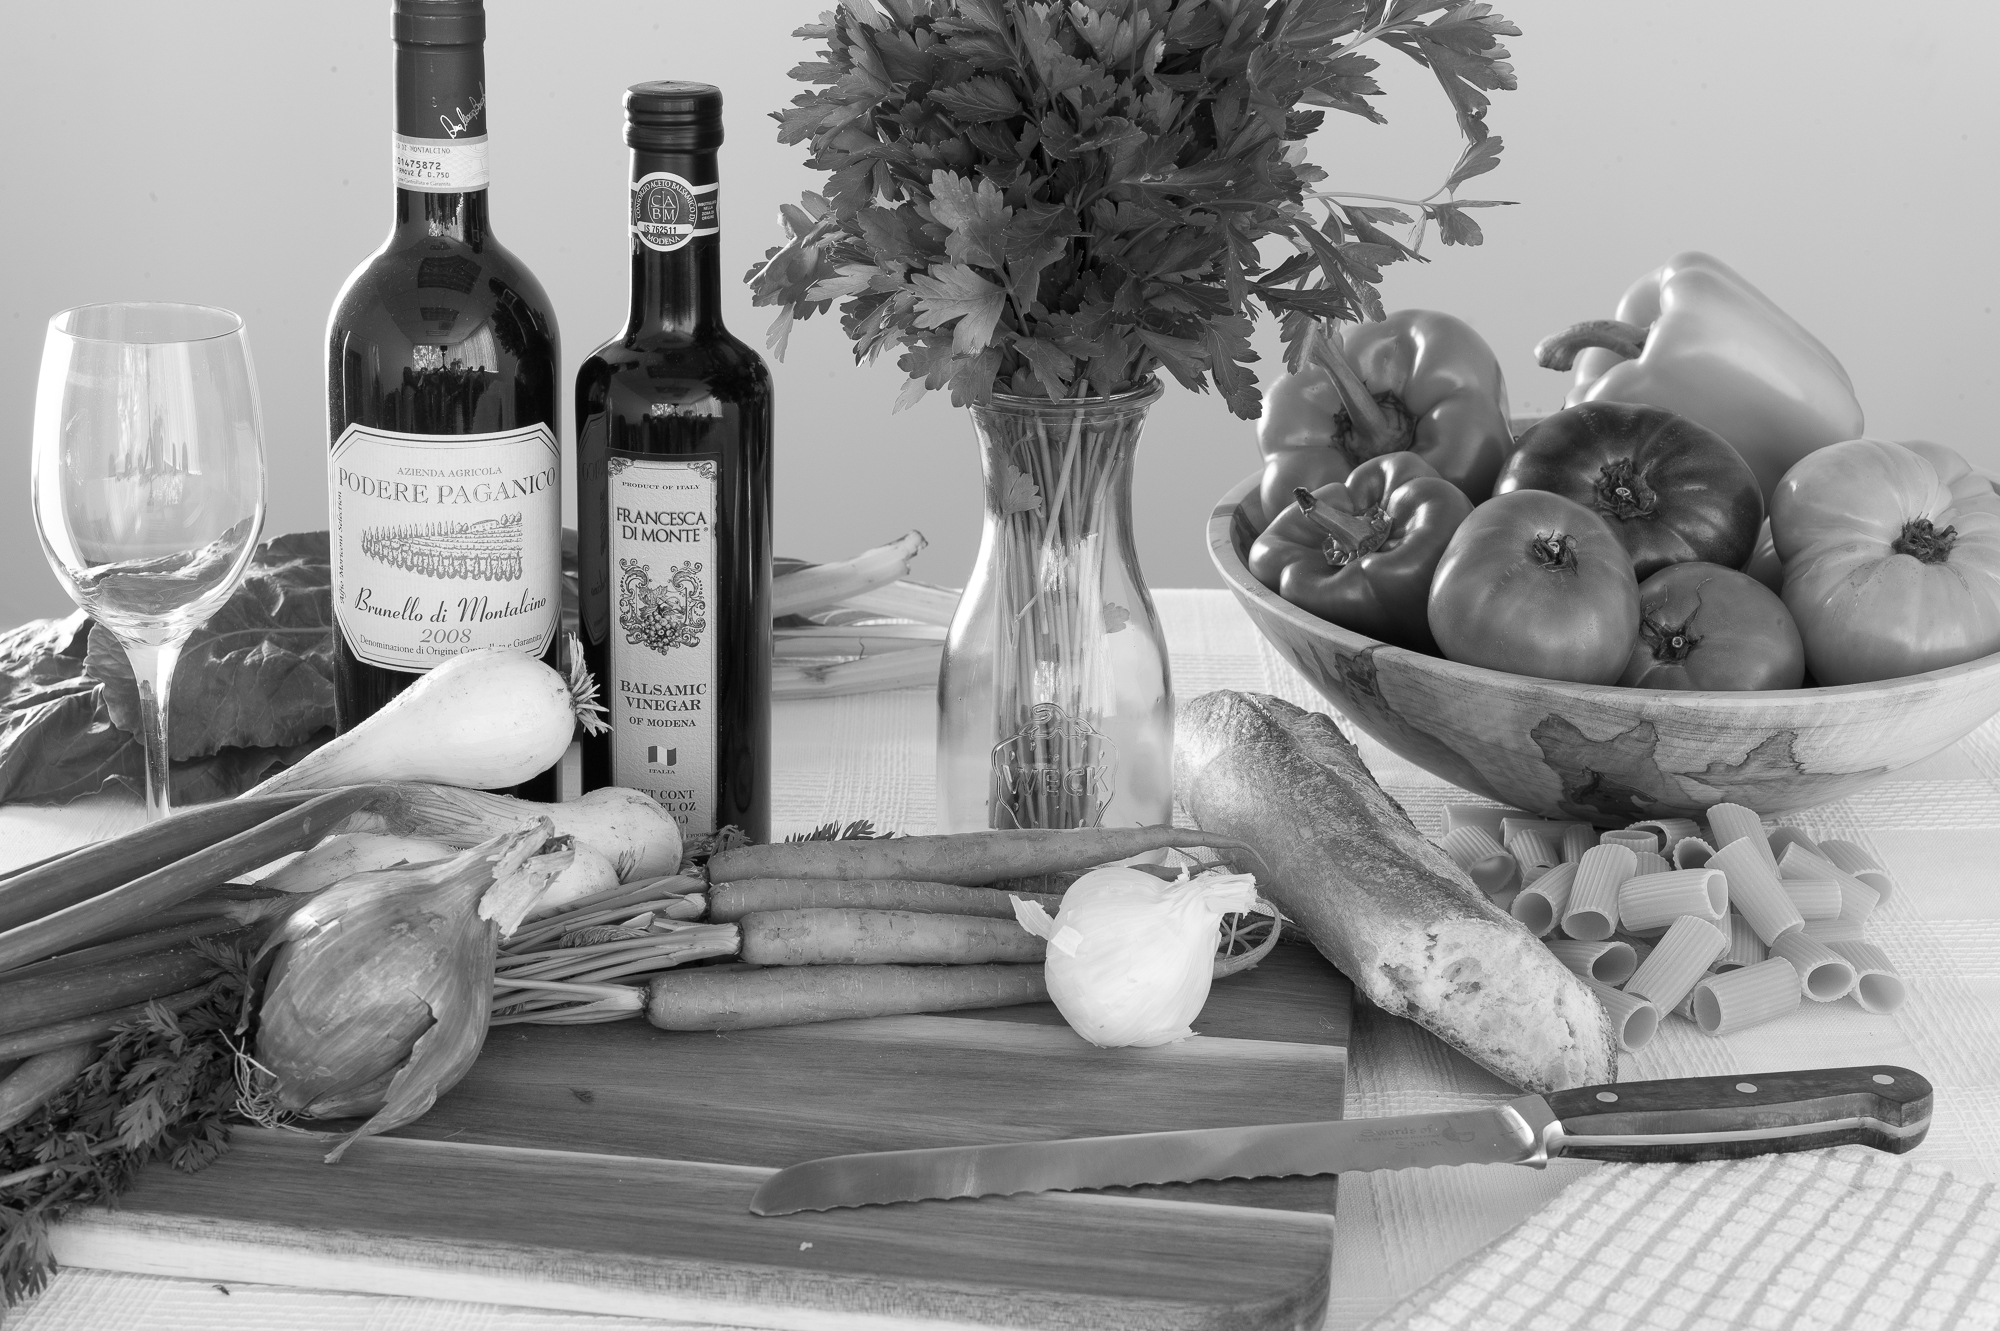
My goal was to provide a broad range of tonality and textures in my test setup. I also wanted something a little nicer than crayons and figurines, so I settled on a creating a food still life. Admittedly, I don't have much practice arranging or photographing tabletop compositions, so this image won't be gracing the cover of a major food magazine anytime soon. Additionally, the food setup had the distinct disadvantage of wilting when using fresh veggies like I did here. So, re-shoots were out of the question. On the plus side,we have lots of natural textures that can give a better idea of organic subjects like the ones you'd find shooting outside.
The scene is set up in our conference room. The overhead fluorescent lighting was turned off. All the light for the scene is coming in through windows in front of the set up. The windows themselves have the vertical blinds mostly closed. The idea was to create even and diffuse illumination, not affected by moving clouds. Luckily, the sky was totally overcast, yet fairly bright during the duration of my test shooting, so this never ended up being a concern.
The cameras were all shot from the same position on a Gitzo tripod using Really Right Stuff bottom plates. This allowed me to use the same quick release clamp for minimal movement between cameras. The same lens, the astonishingly good 50mm APO-Summicron, was used on each camera with the focus set at the exact same distance, with all exposures taken at f/11 to maximize depth of field while avoiding diffraction. To eliminate any camera vibration, I used a self timer for all shots.
Processing the Files
Following the photo shoot, I processed the files in Adobe Lightroom 6. Minimal corrections were applied in order to match the images to one another. The results are not “out-of-camera” nor should they be in my opinion. In fact, I adjusted noise reduction and varied sharpening settings on all the higher ISO images from each of the three cameras. My goal in this test was to see how fully optimized images from each of the three cameras compared at each ISO in the range. I didn't really care what they would have looked like without noise reduction, because I would always apply at least some NR for high ISO images. Similarly, I always apply base level sharpening to all files. The real question for me was how the files matched up for real world usage, so that is how the test was geared.
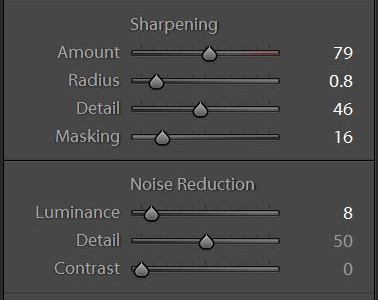
Sample sharpening and noise reduction settings used
All files were exported from LR using the highest level of JPG quality (100) with the least compression, with no image resizing. Why didn't I use TIFF? In my experience, there is no visible difference in a highest quality JPG and a TIFF, and perhaps more importantly, the Photoshop file I used to composite all of these images together was already bursting at the seams, weighing in at close to 5GB. Yes, for a single file. I shudder to think how large the file would have been had I used TIFFs.
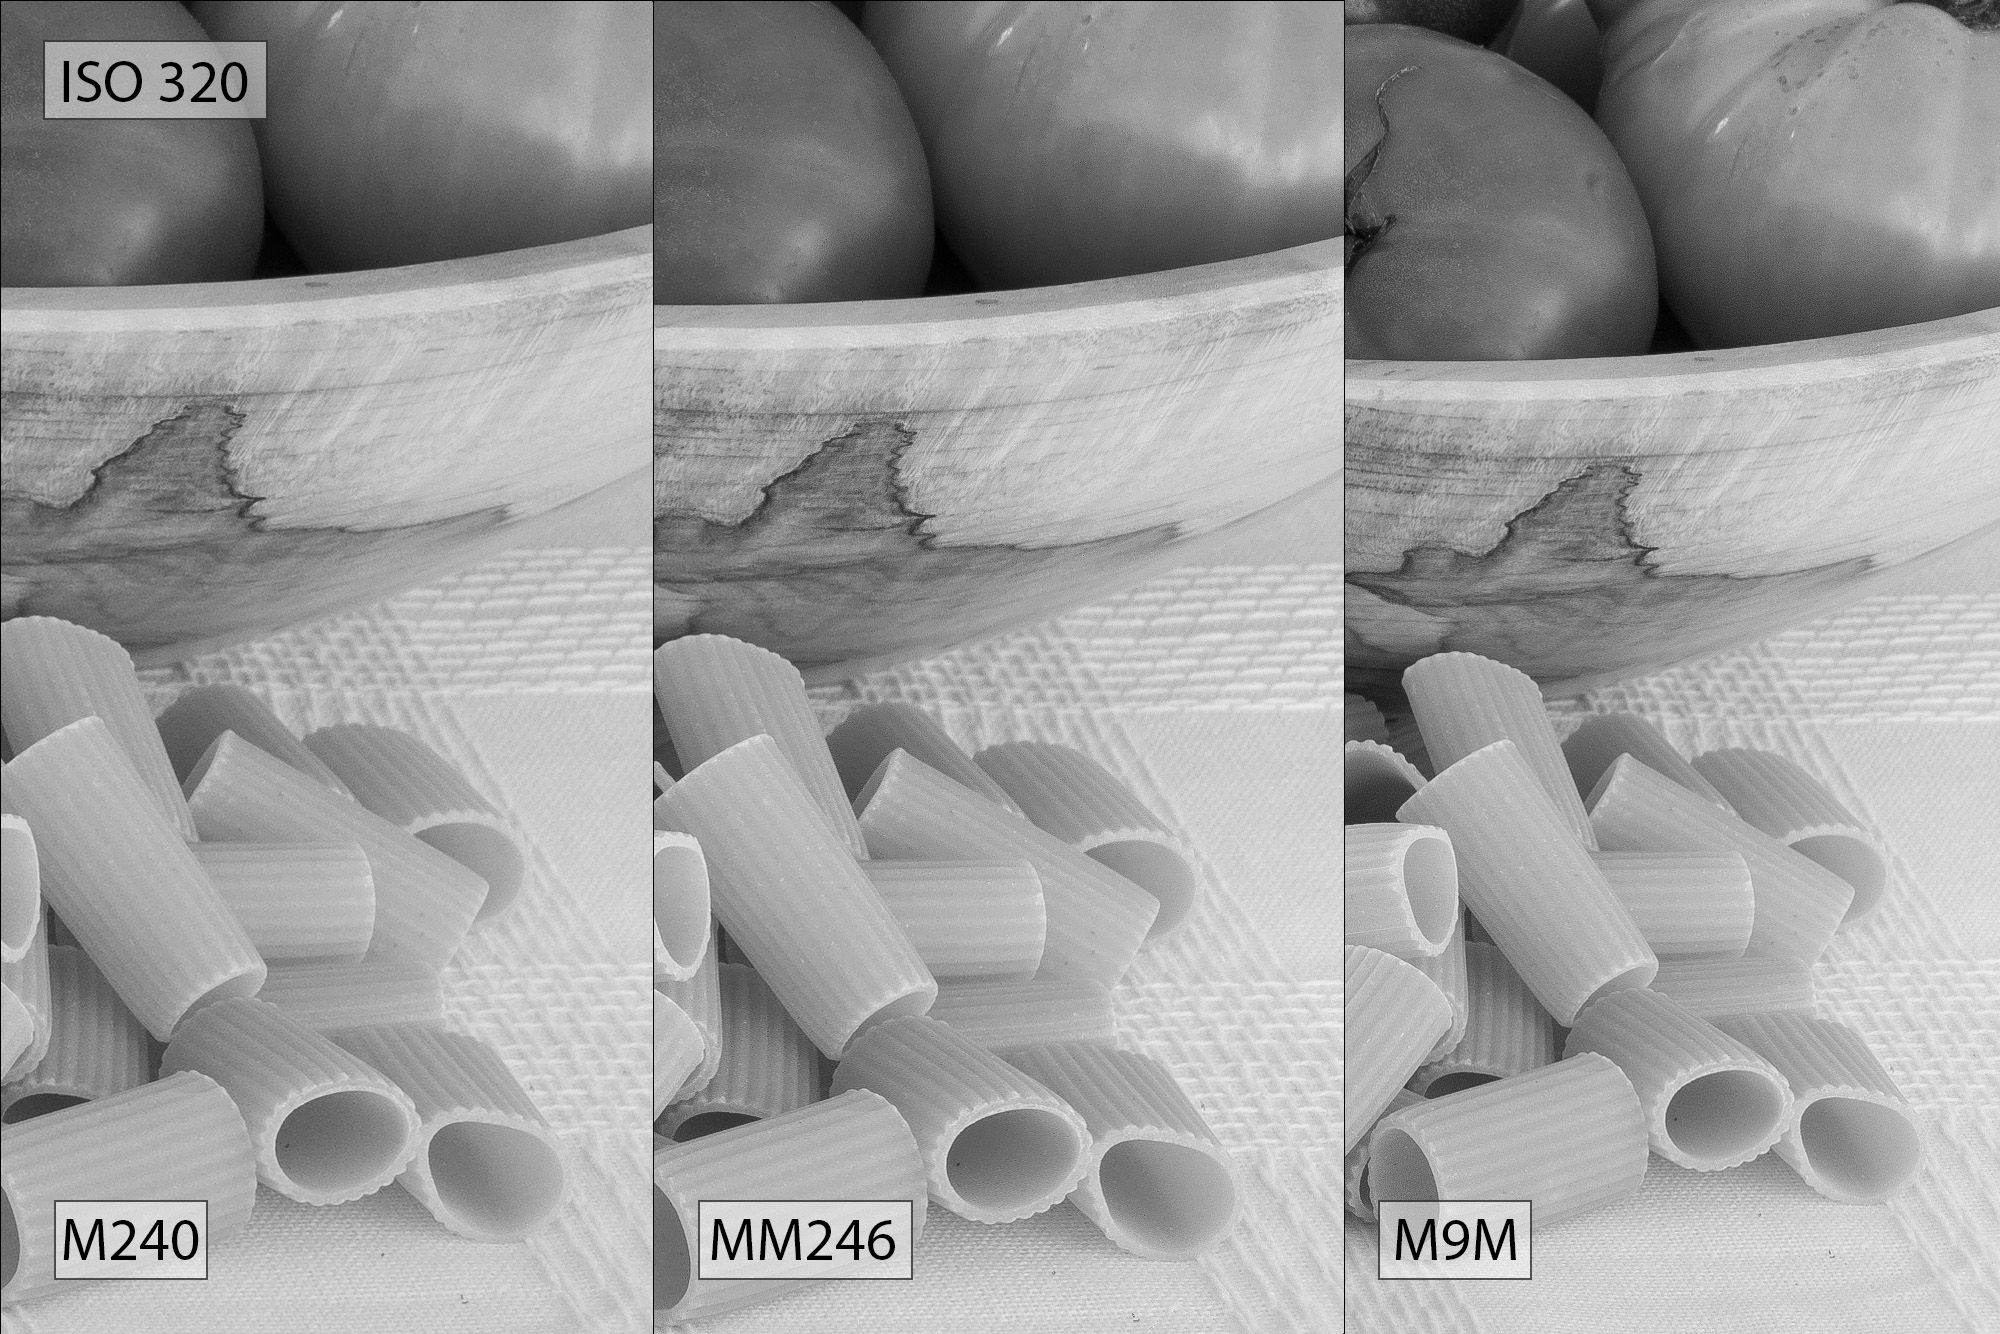
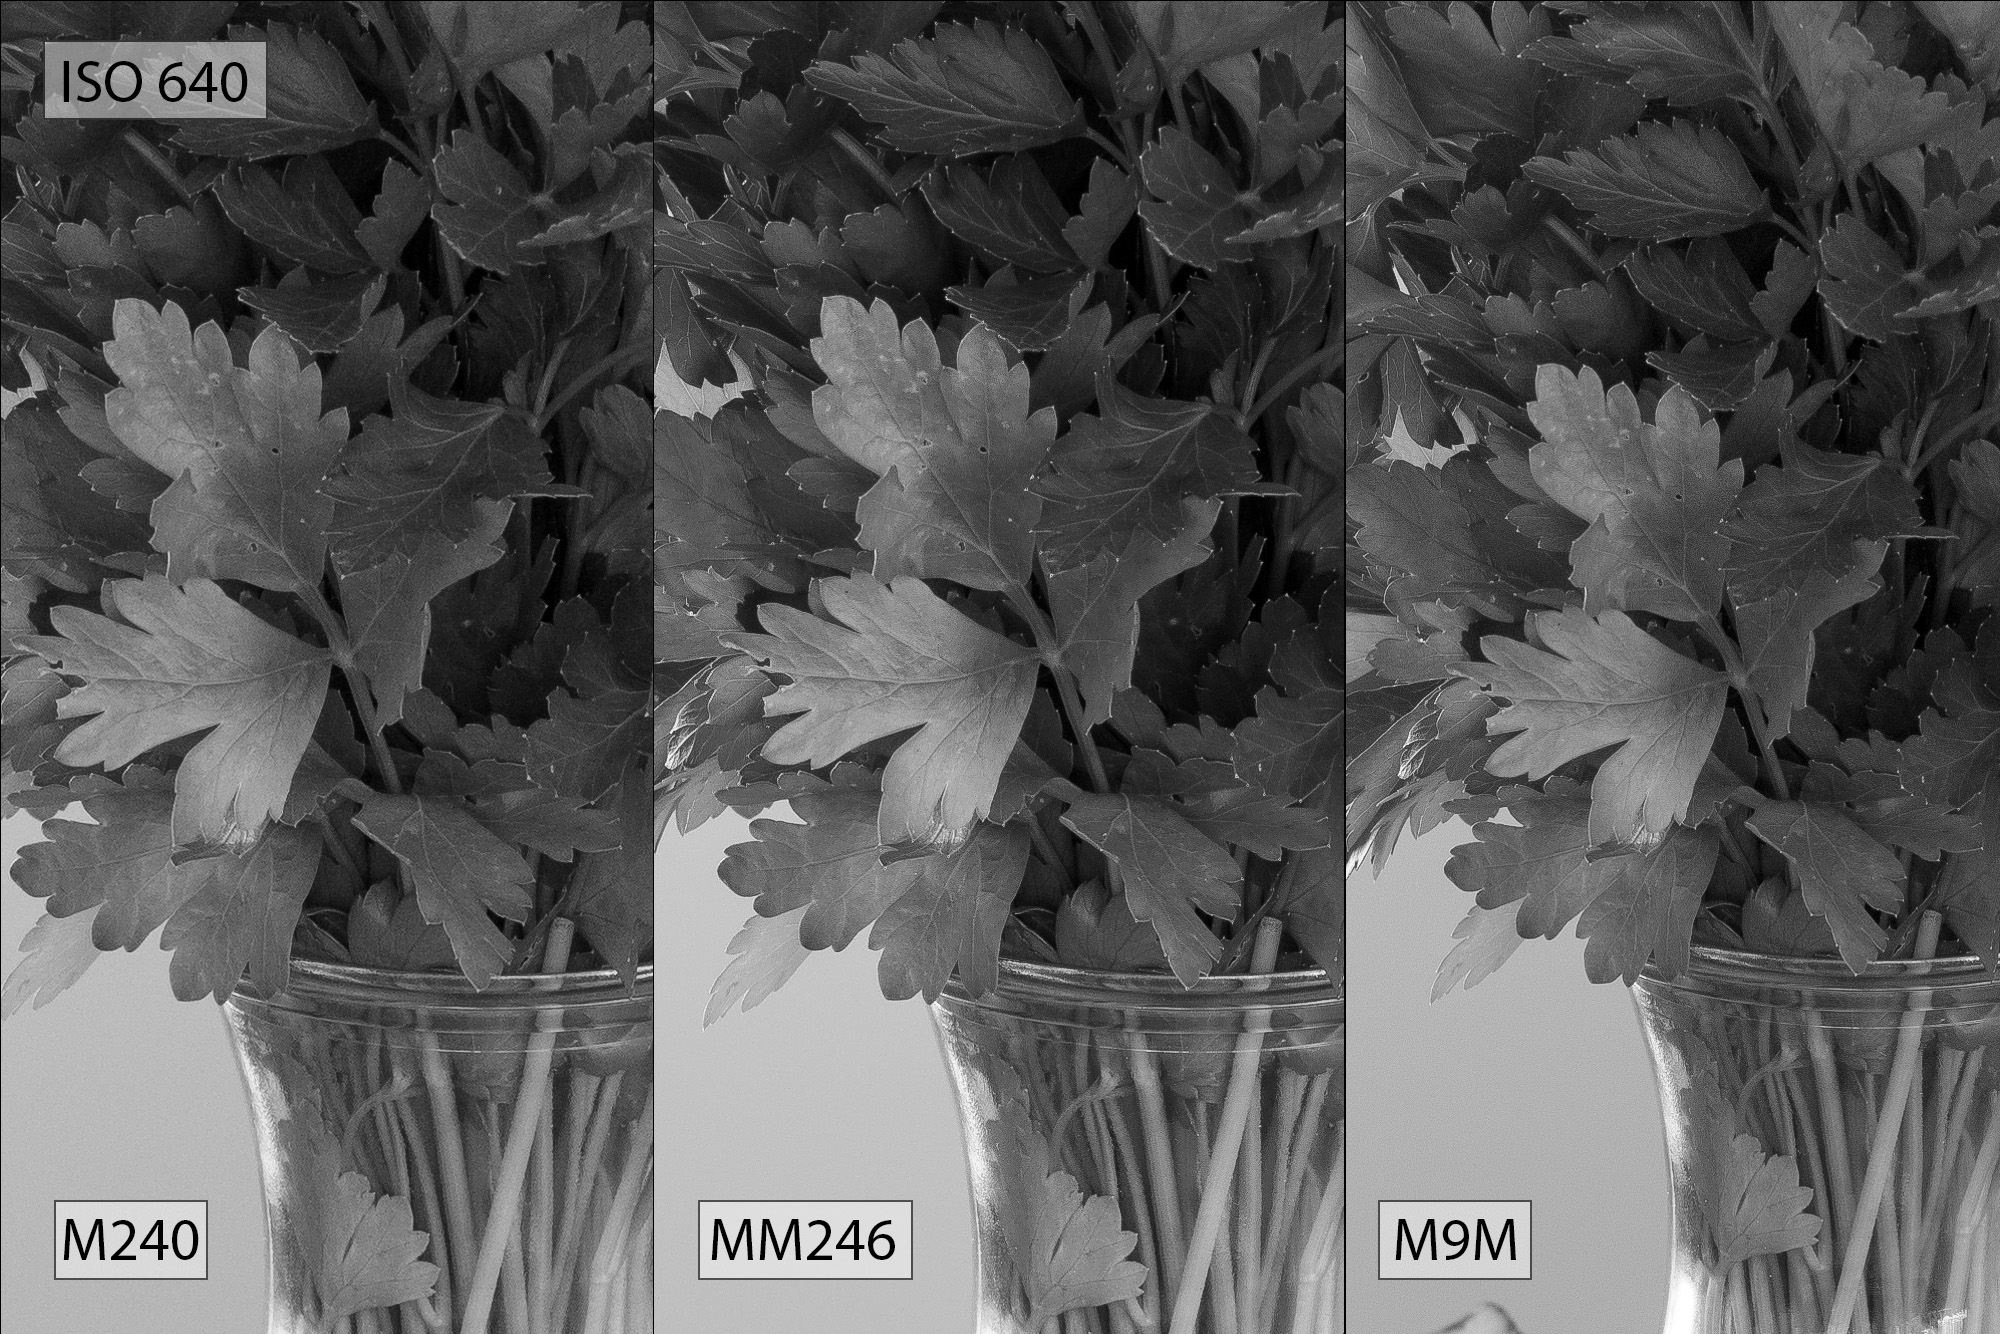
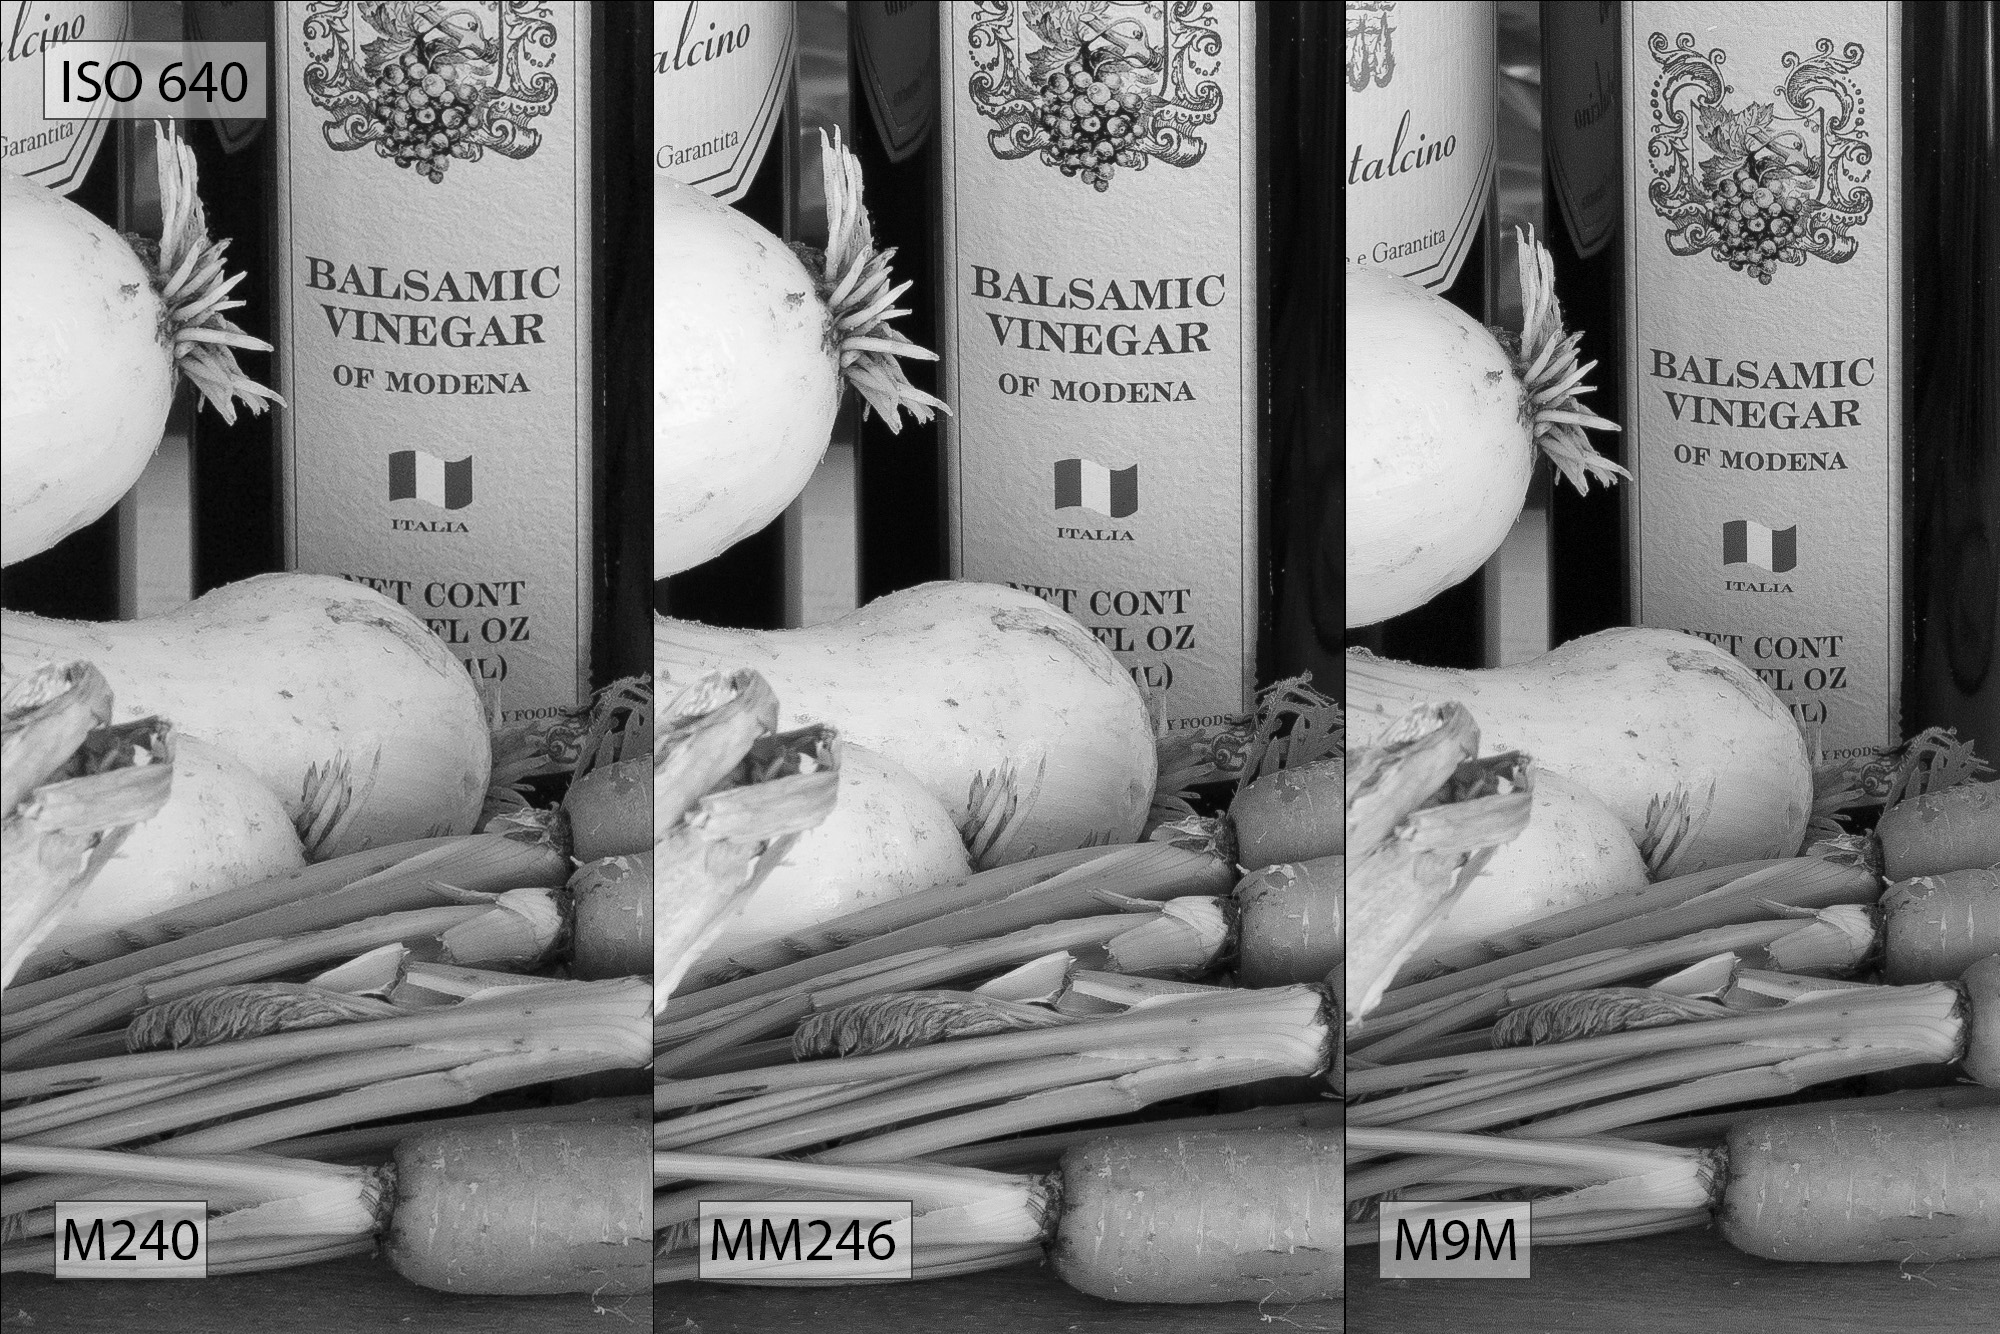
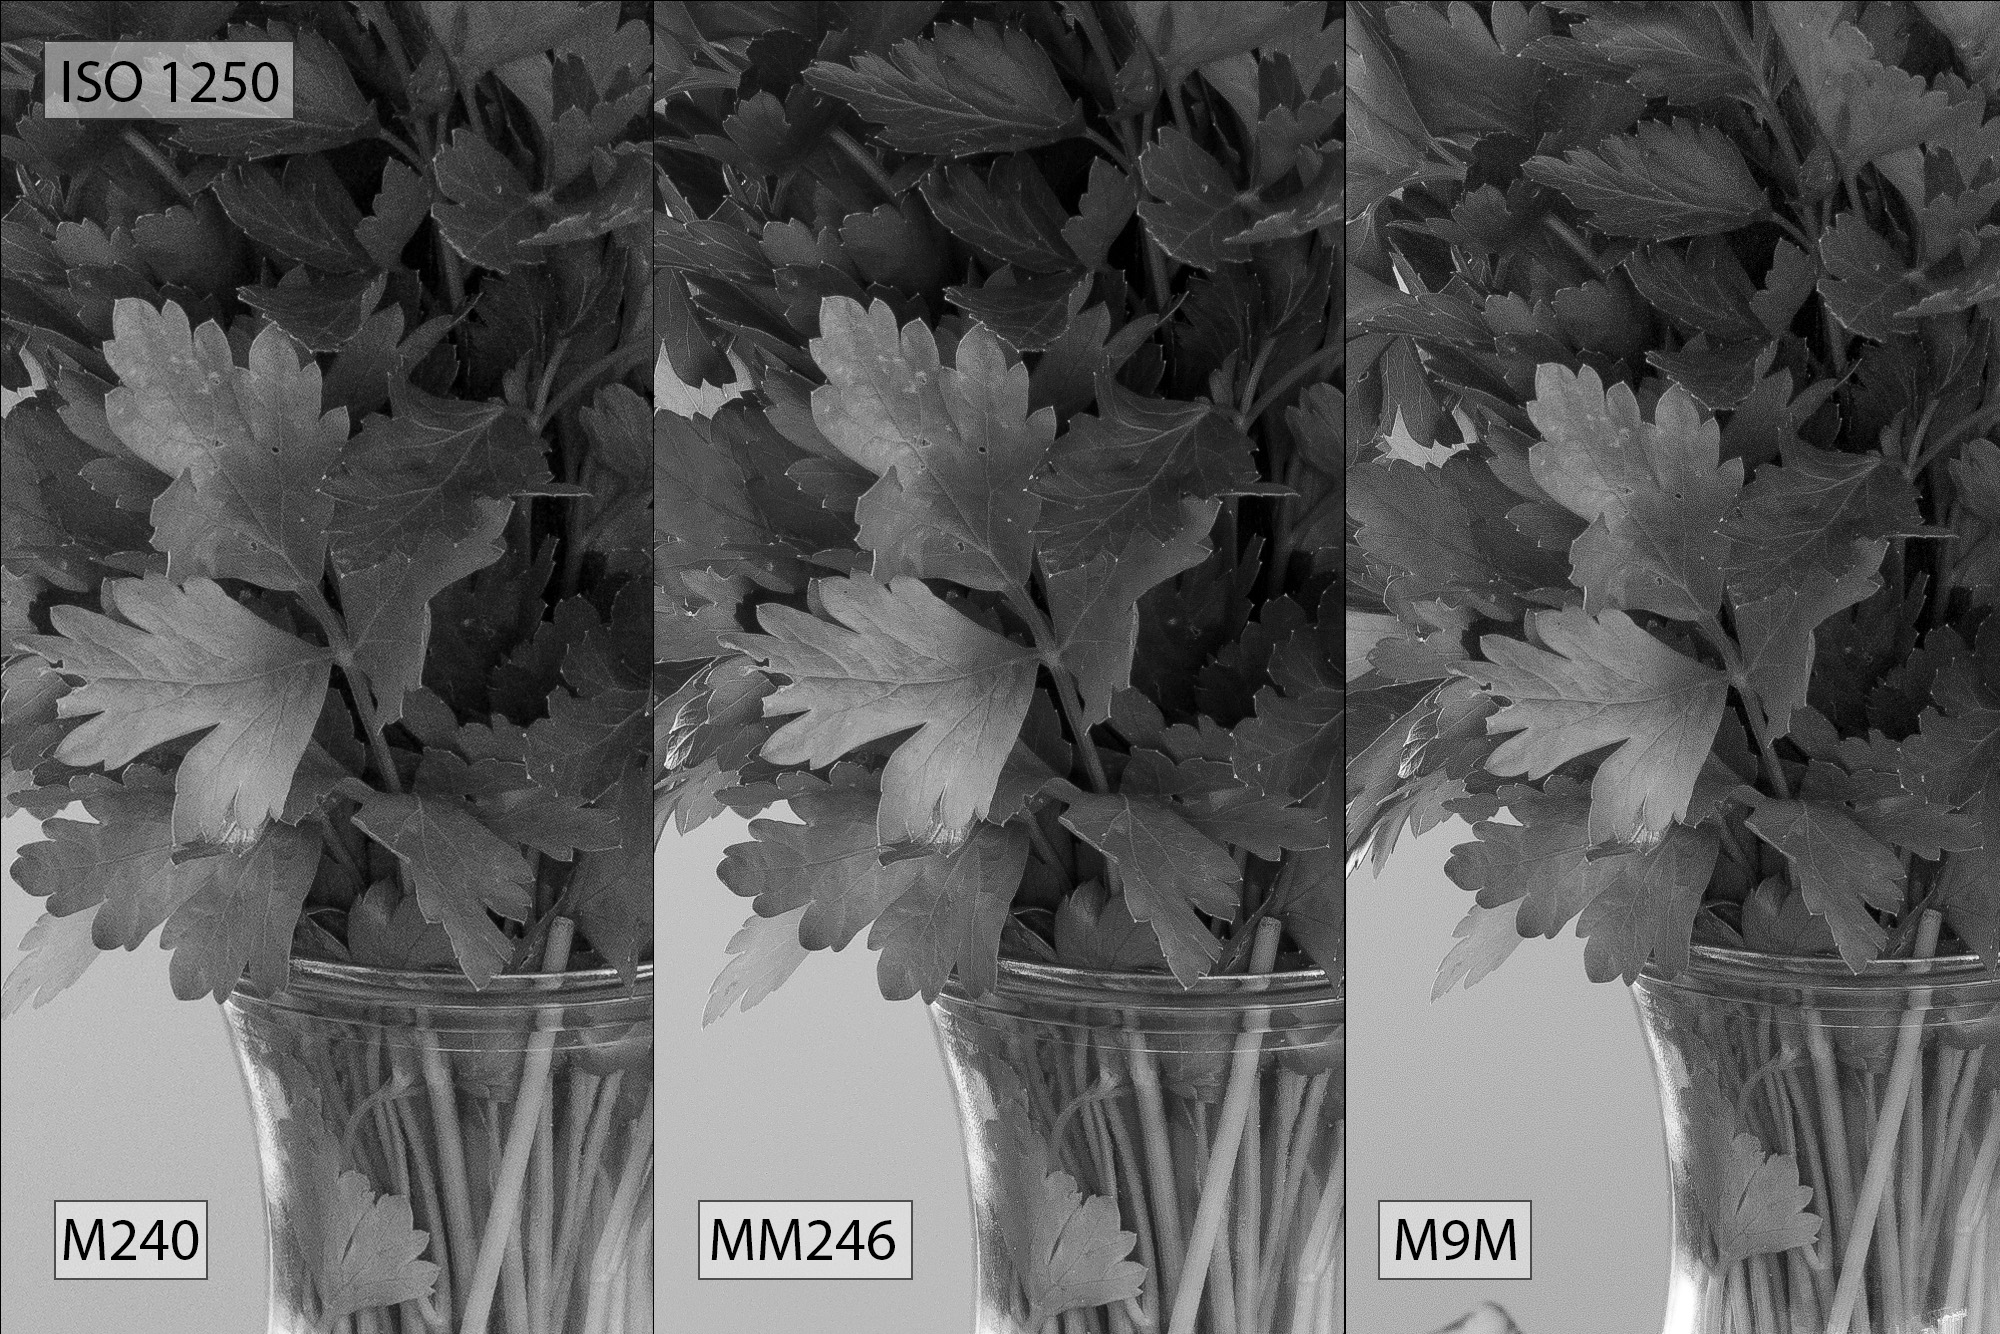
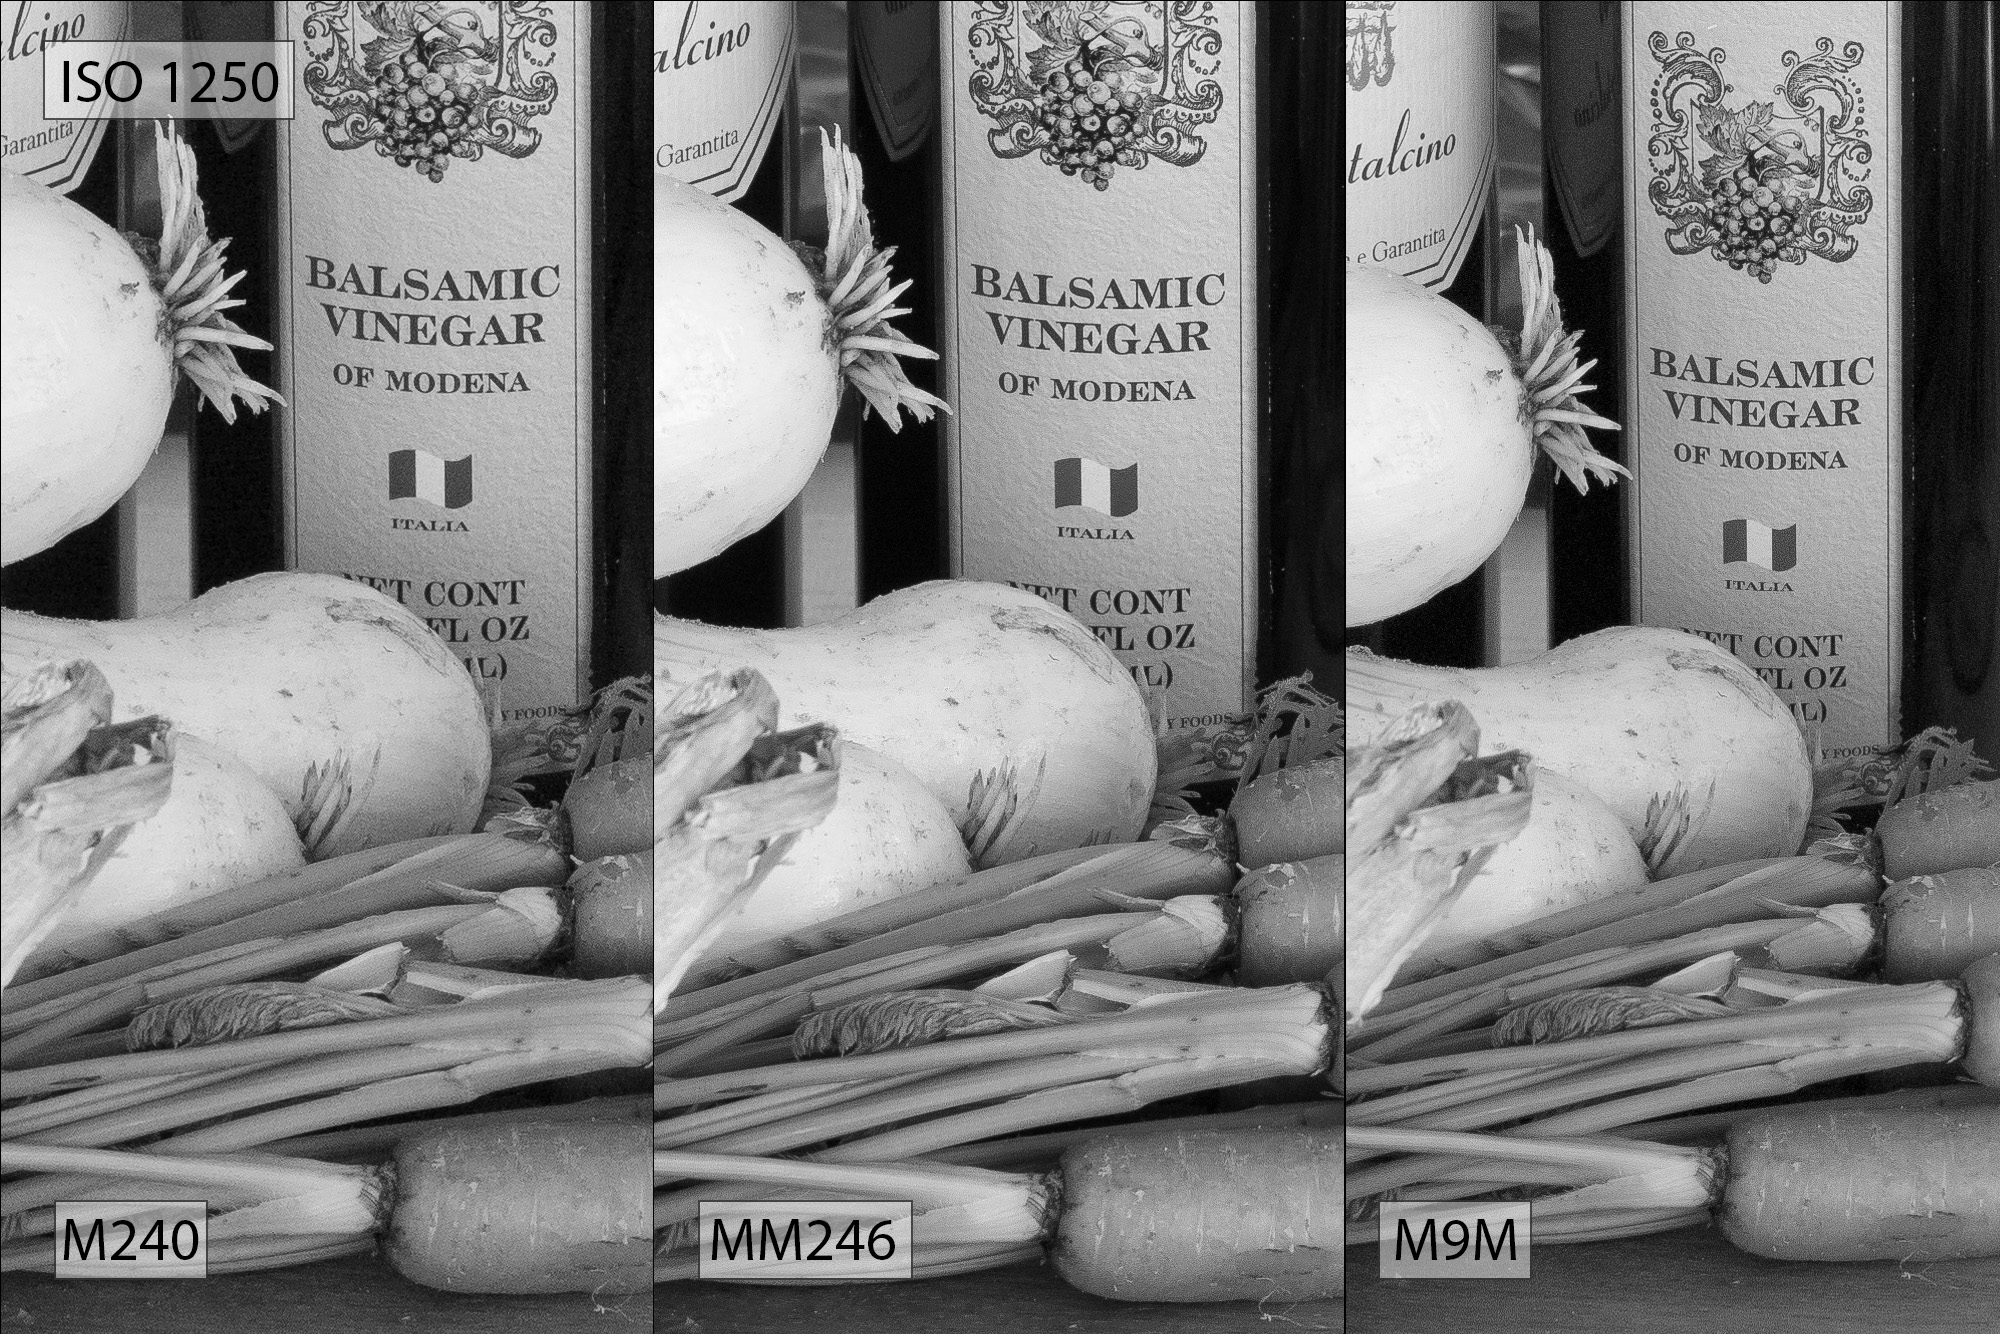
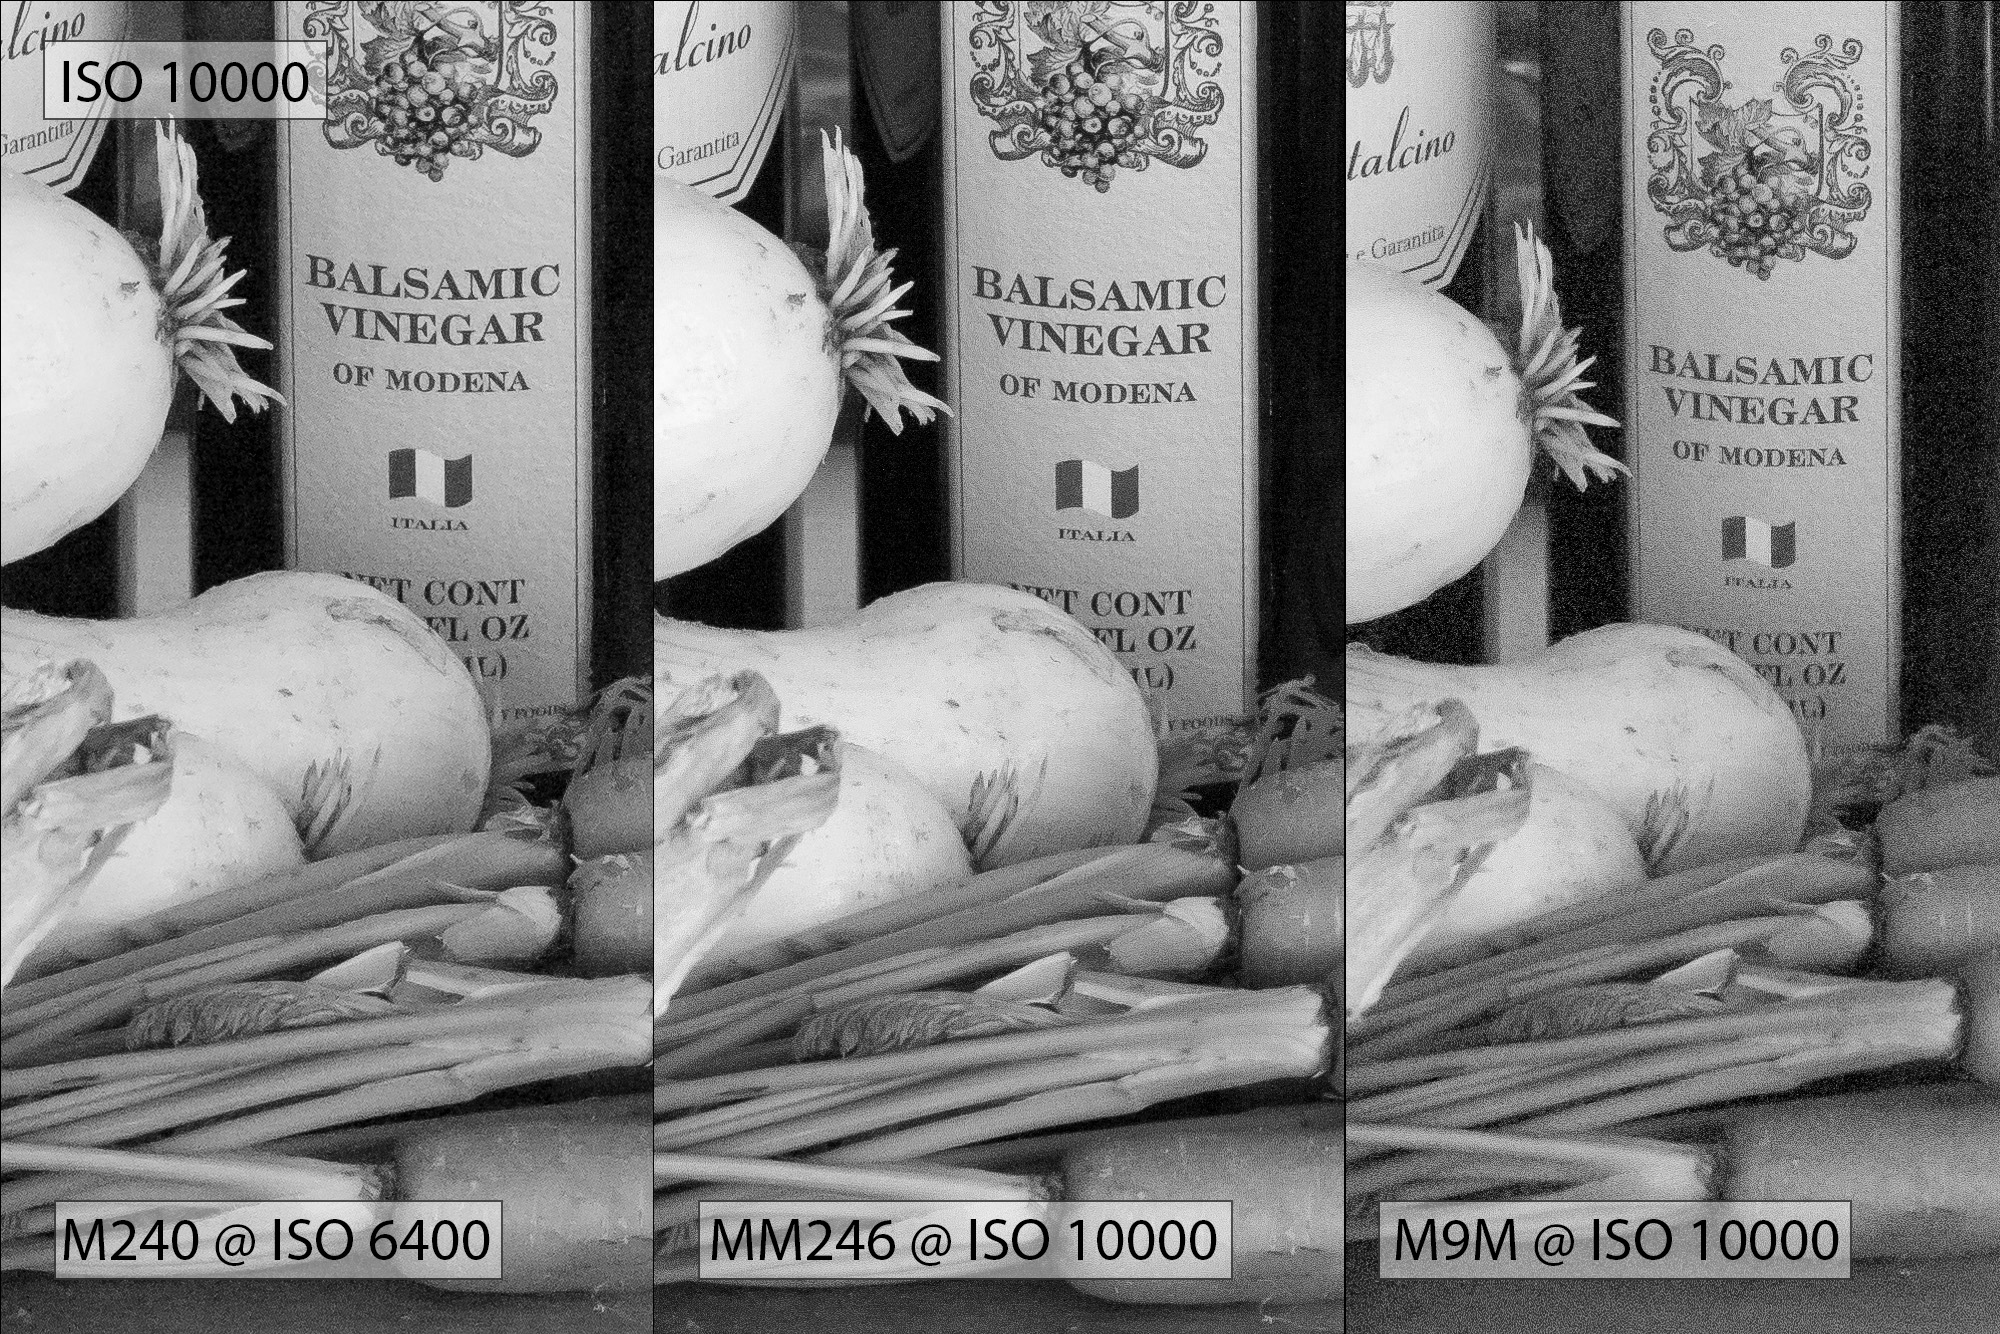
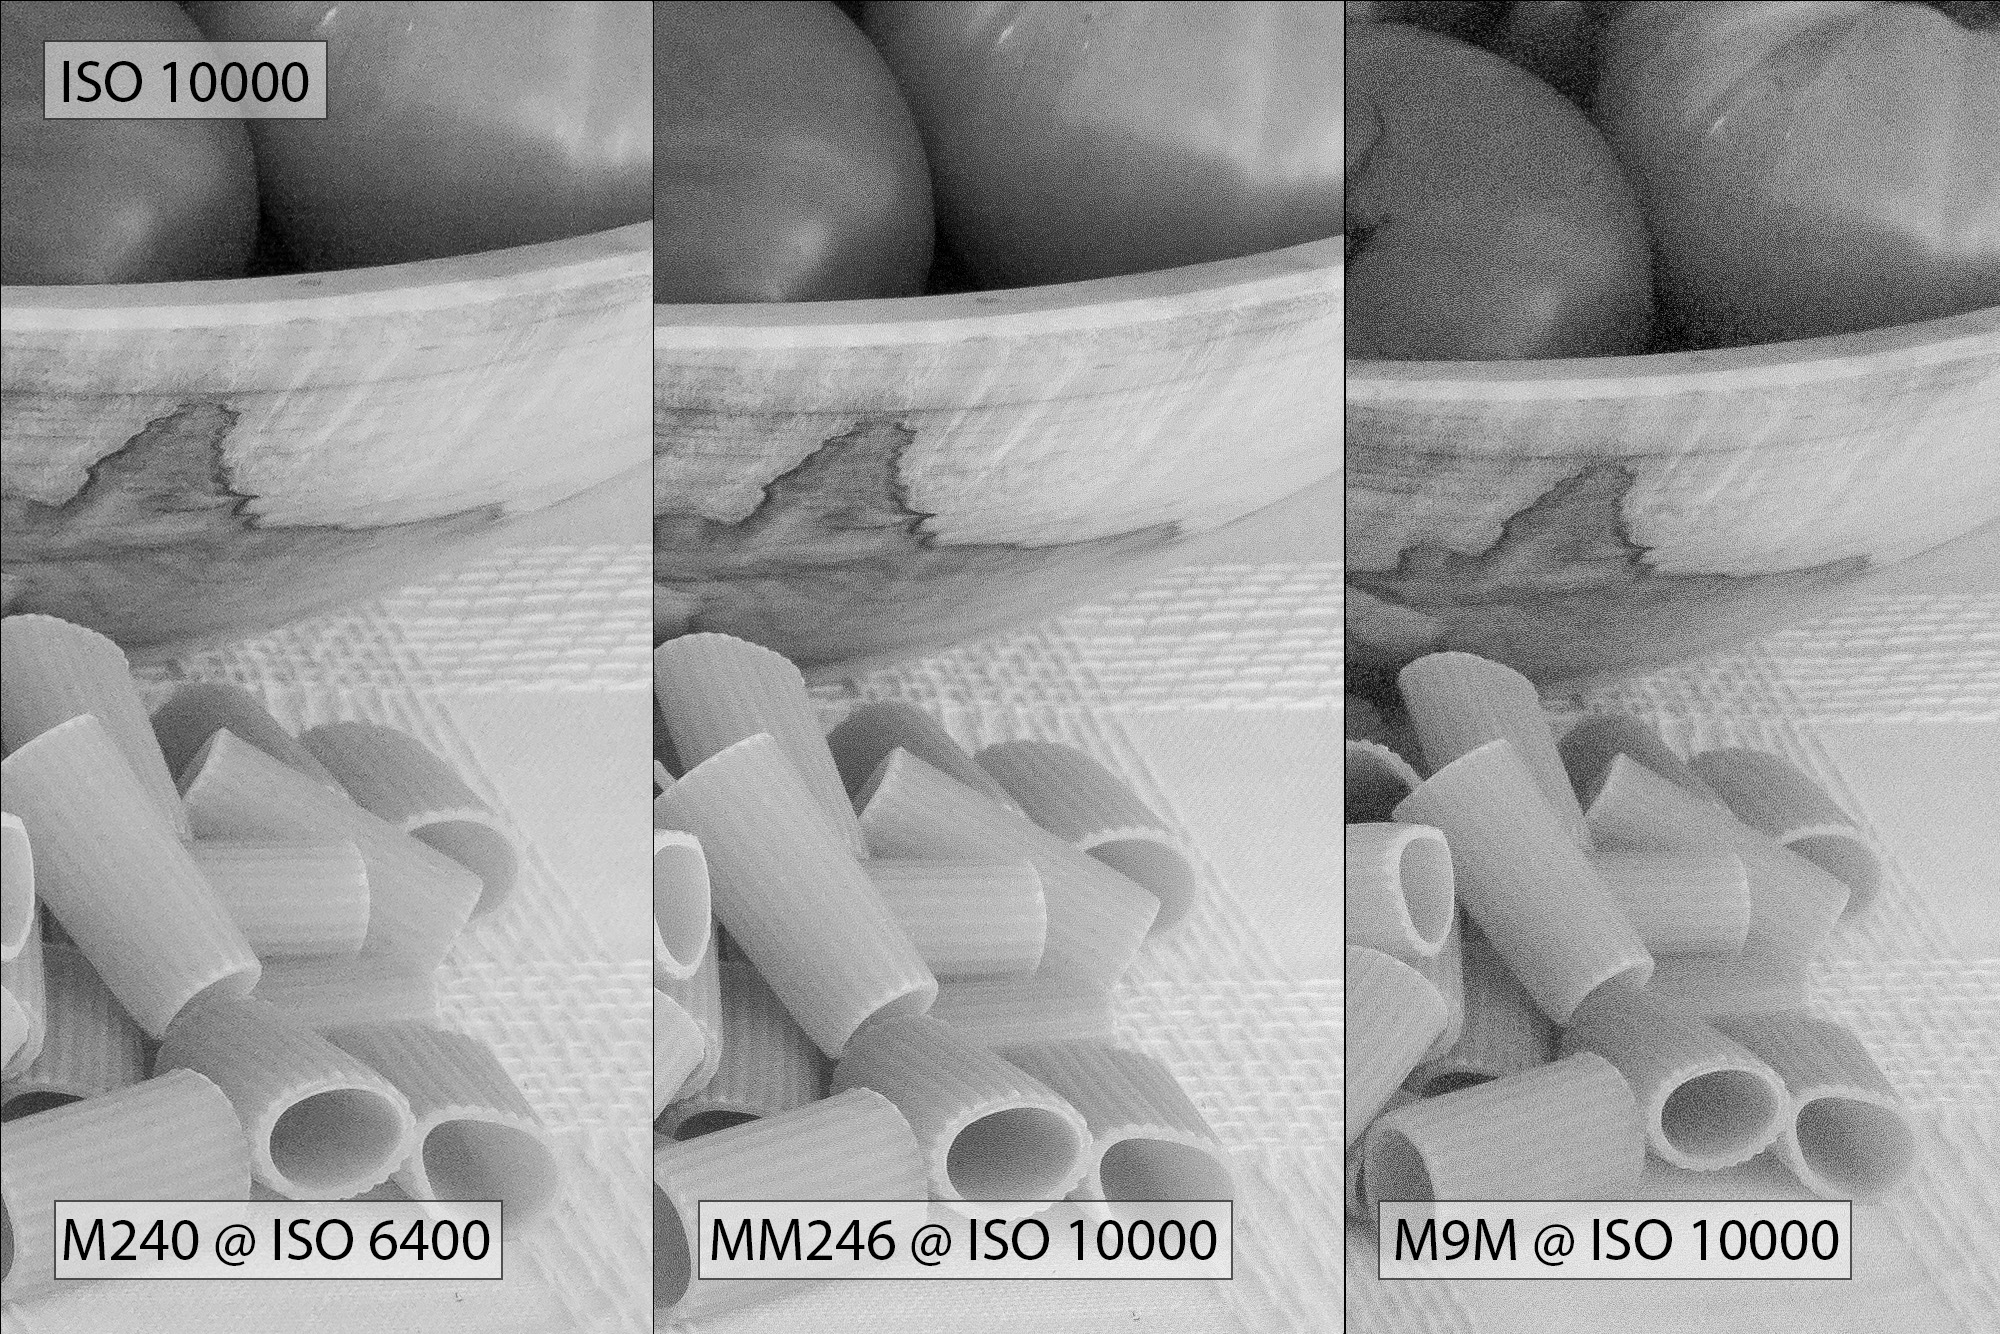
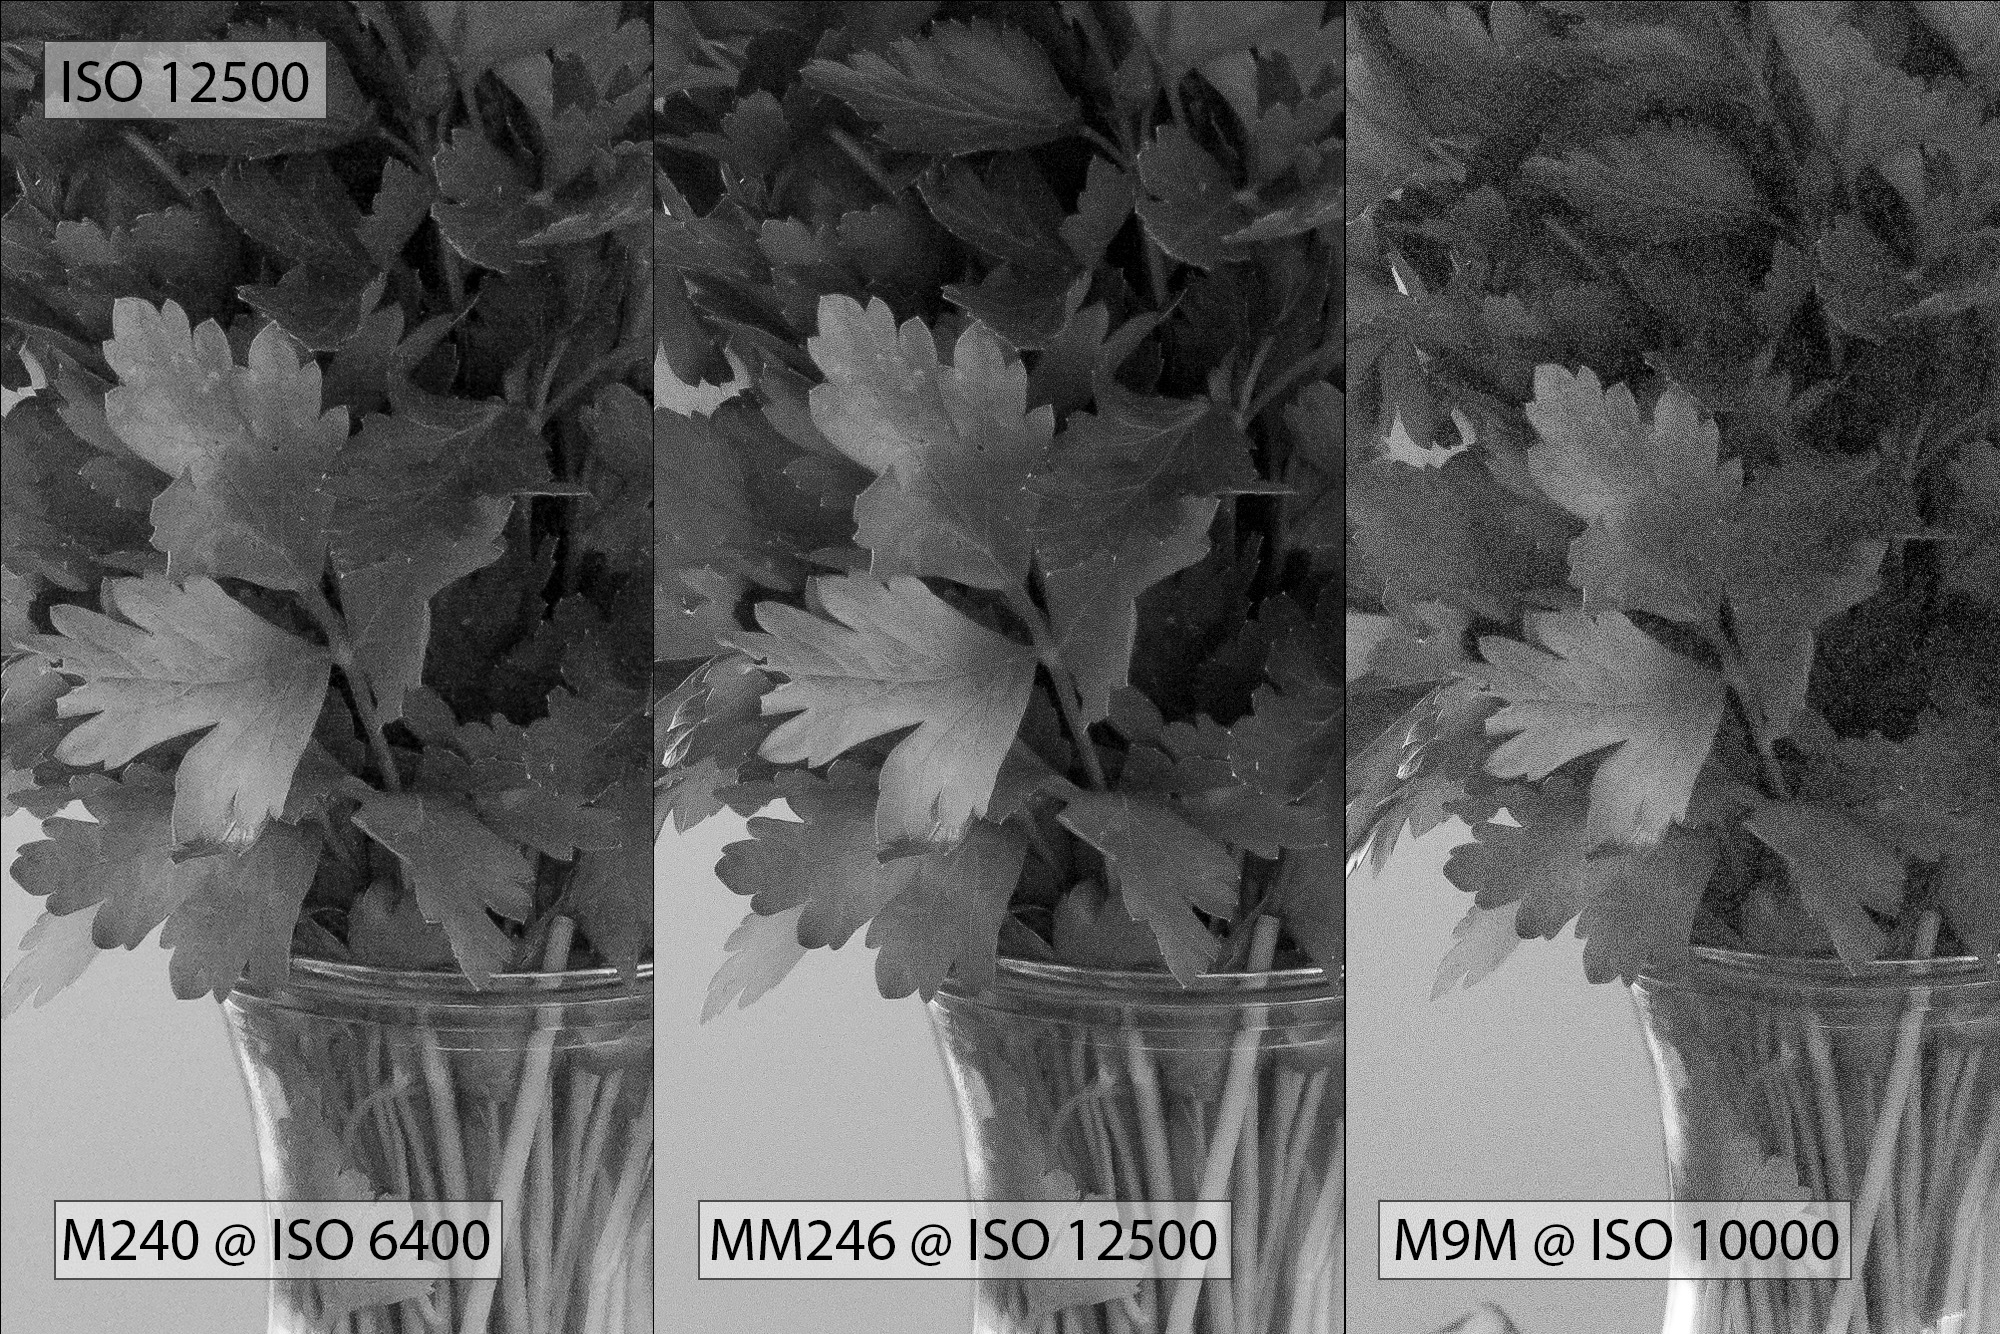
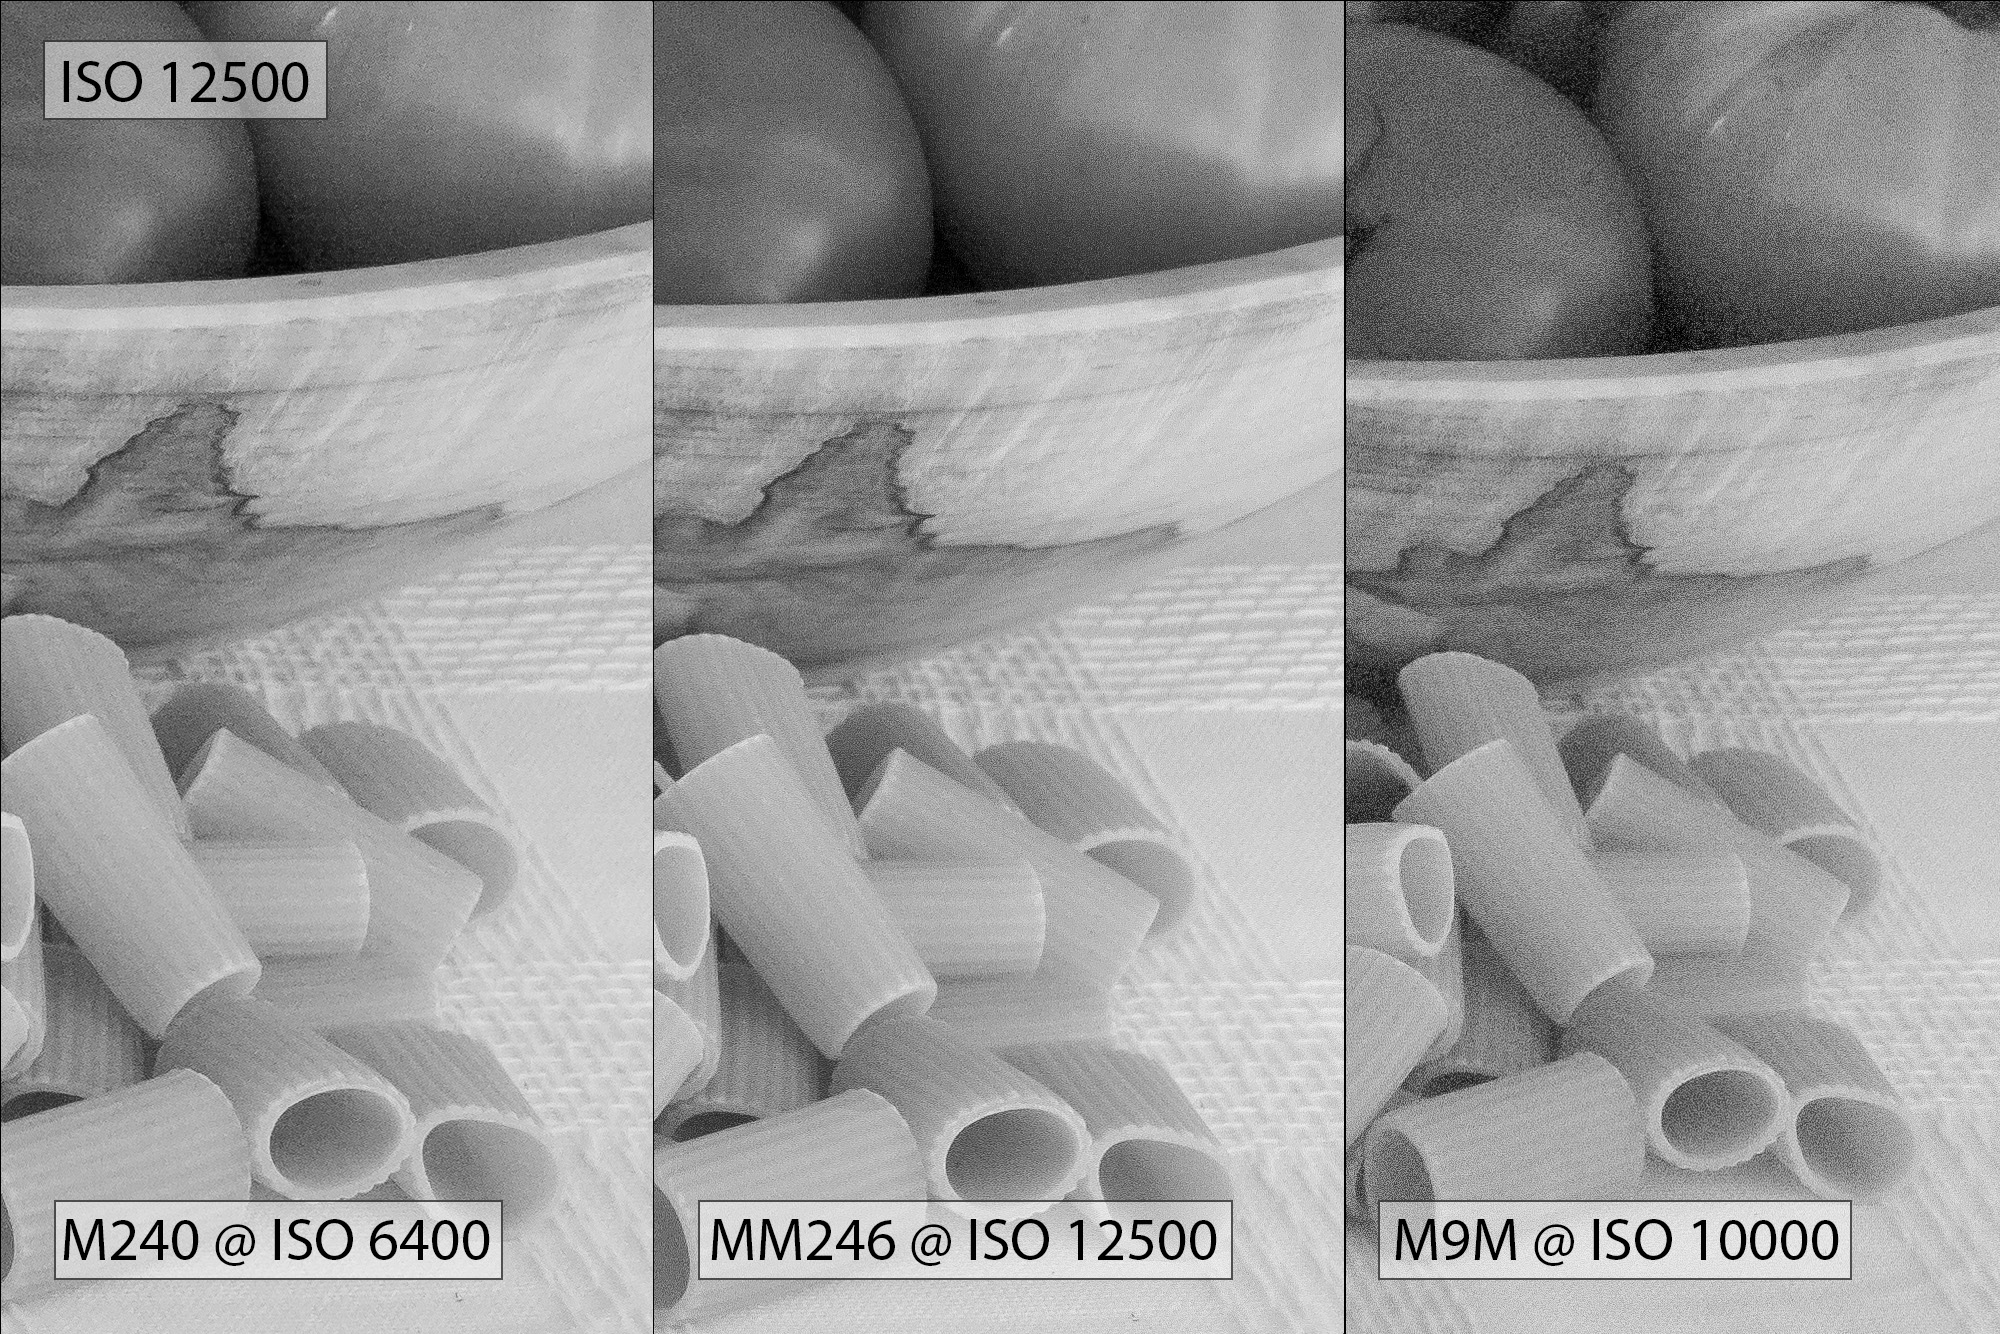
I picked out three sections to evaluate the images. The first is the parsley. There is tons of textural information and the crop is comprised mostly of darker tones and shadows. The second is the balsamic vinegar bottle, spring onions and carrots. The label has nice sharp print with the almost black bottle representing the very darkest part of the image. The root vegetables give us a broad tonal range and different types of textures. The last crop is of the dried pasta and white tablecloth. These are some of the lightest midtones, again with lots of textural information. The tomatoes and wooden bowl offer some smooth areas to look at for tonal transitions. I actually had a difficult time picking out sections, as there are quite a few other cropped areas that I thought were fascinating with regards to the differences shown and/or details revealed.
Here are the full frame captures for each camera, as well as what the scene looked like in full color:
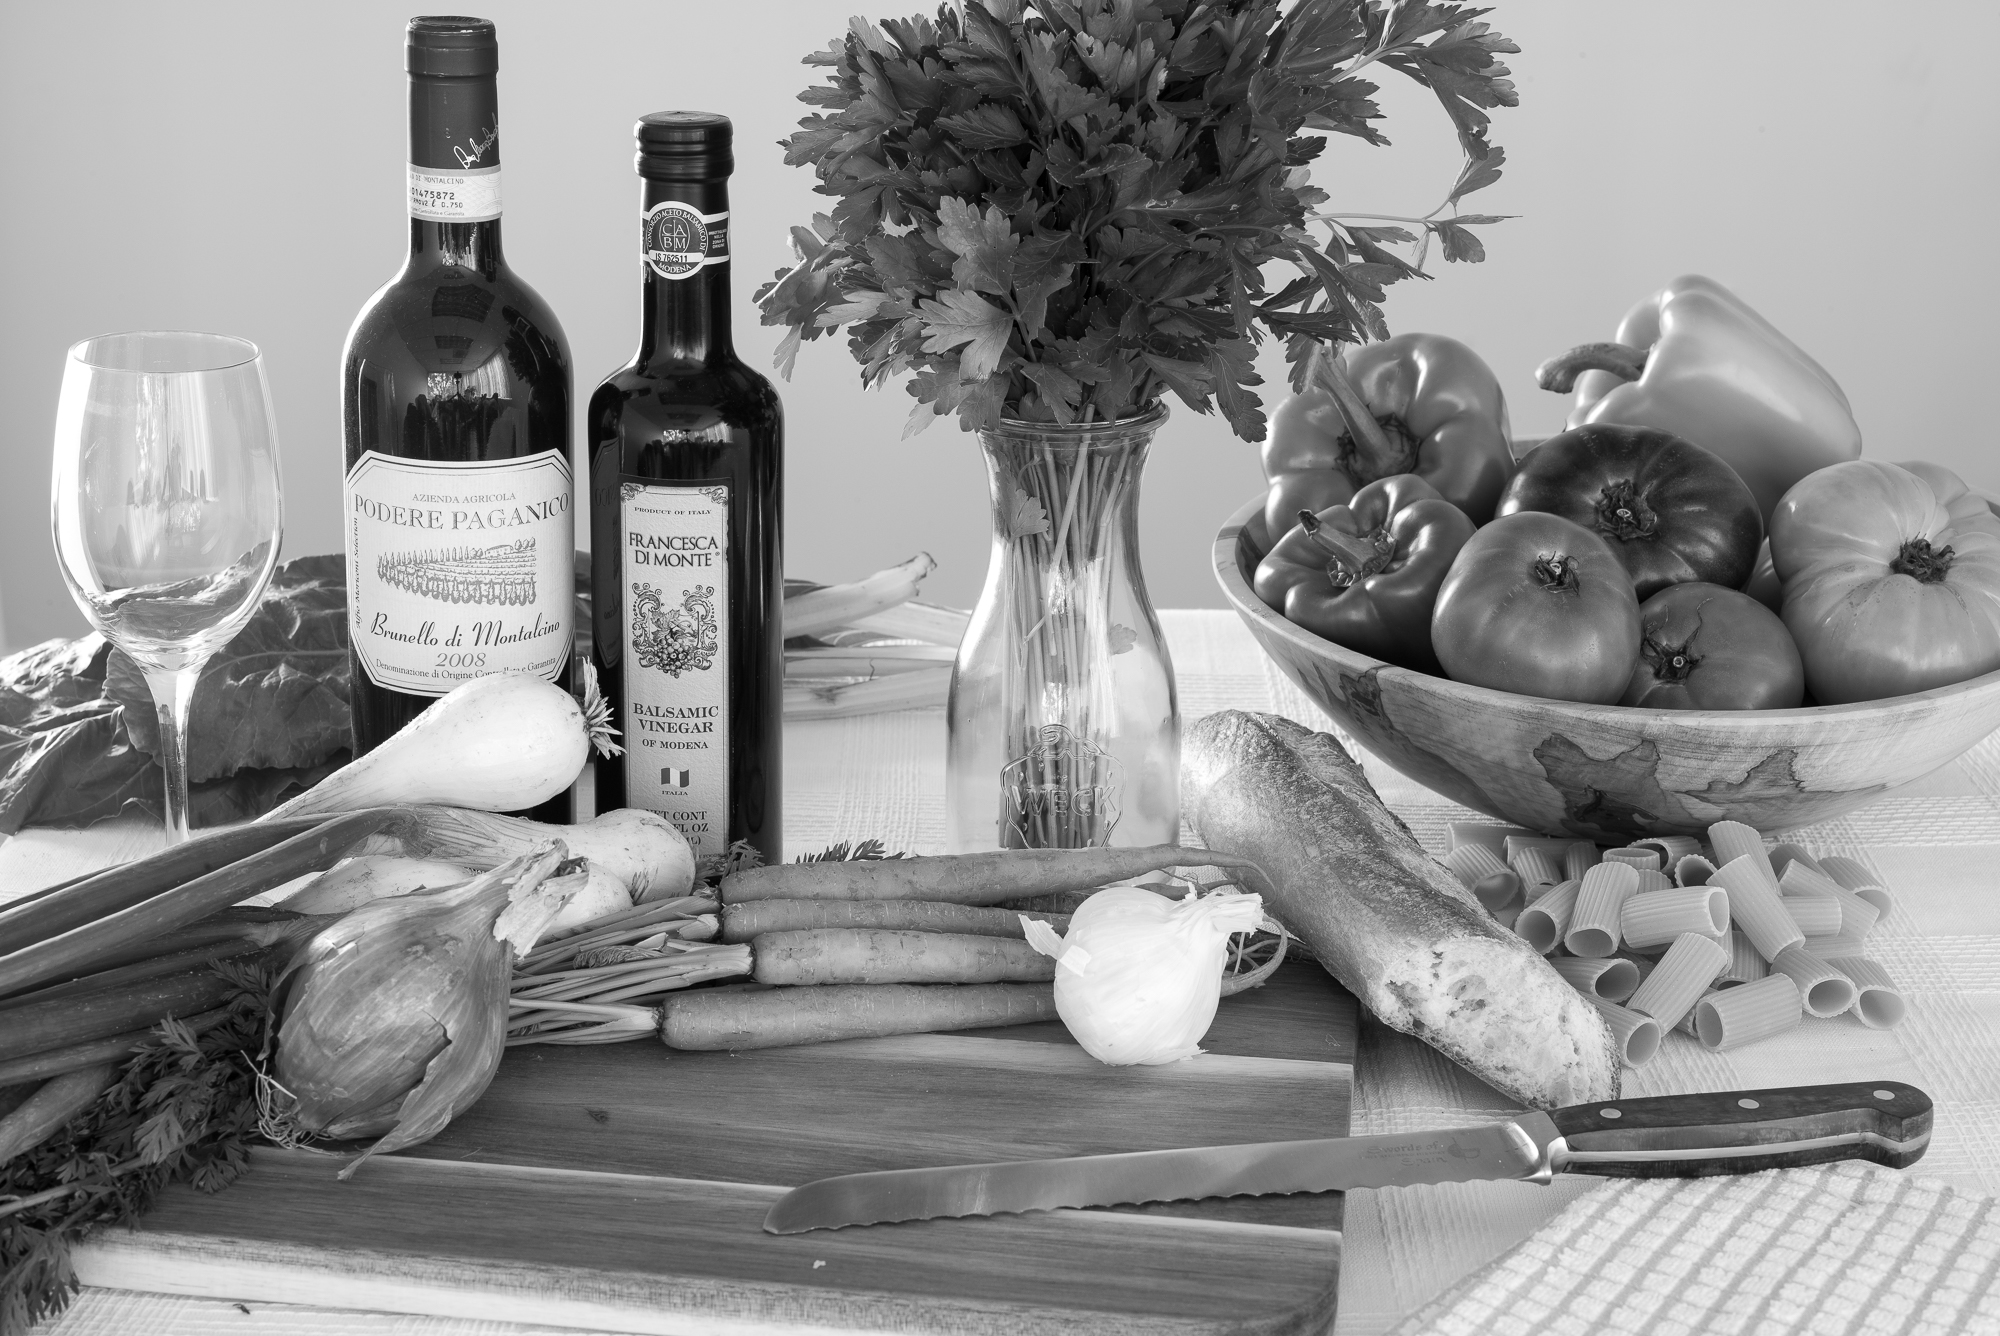
LEICA M MONOCHROM (Typ 246) Full Image

LEICA M (Typ 240) Full Image (original color)
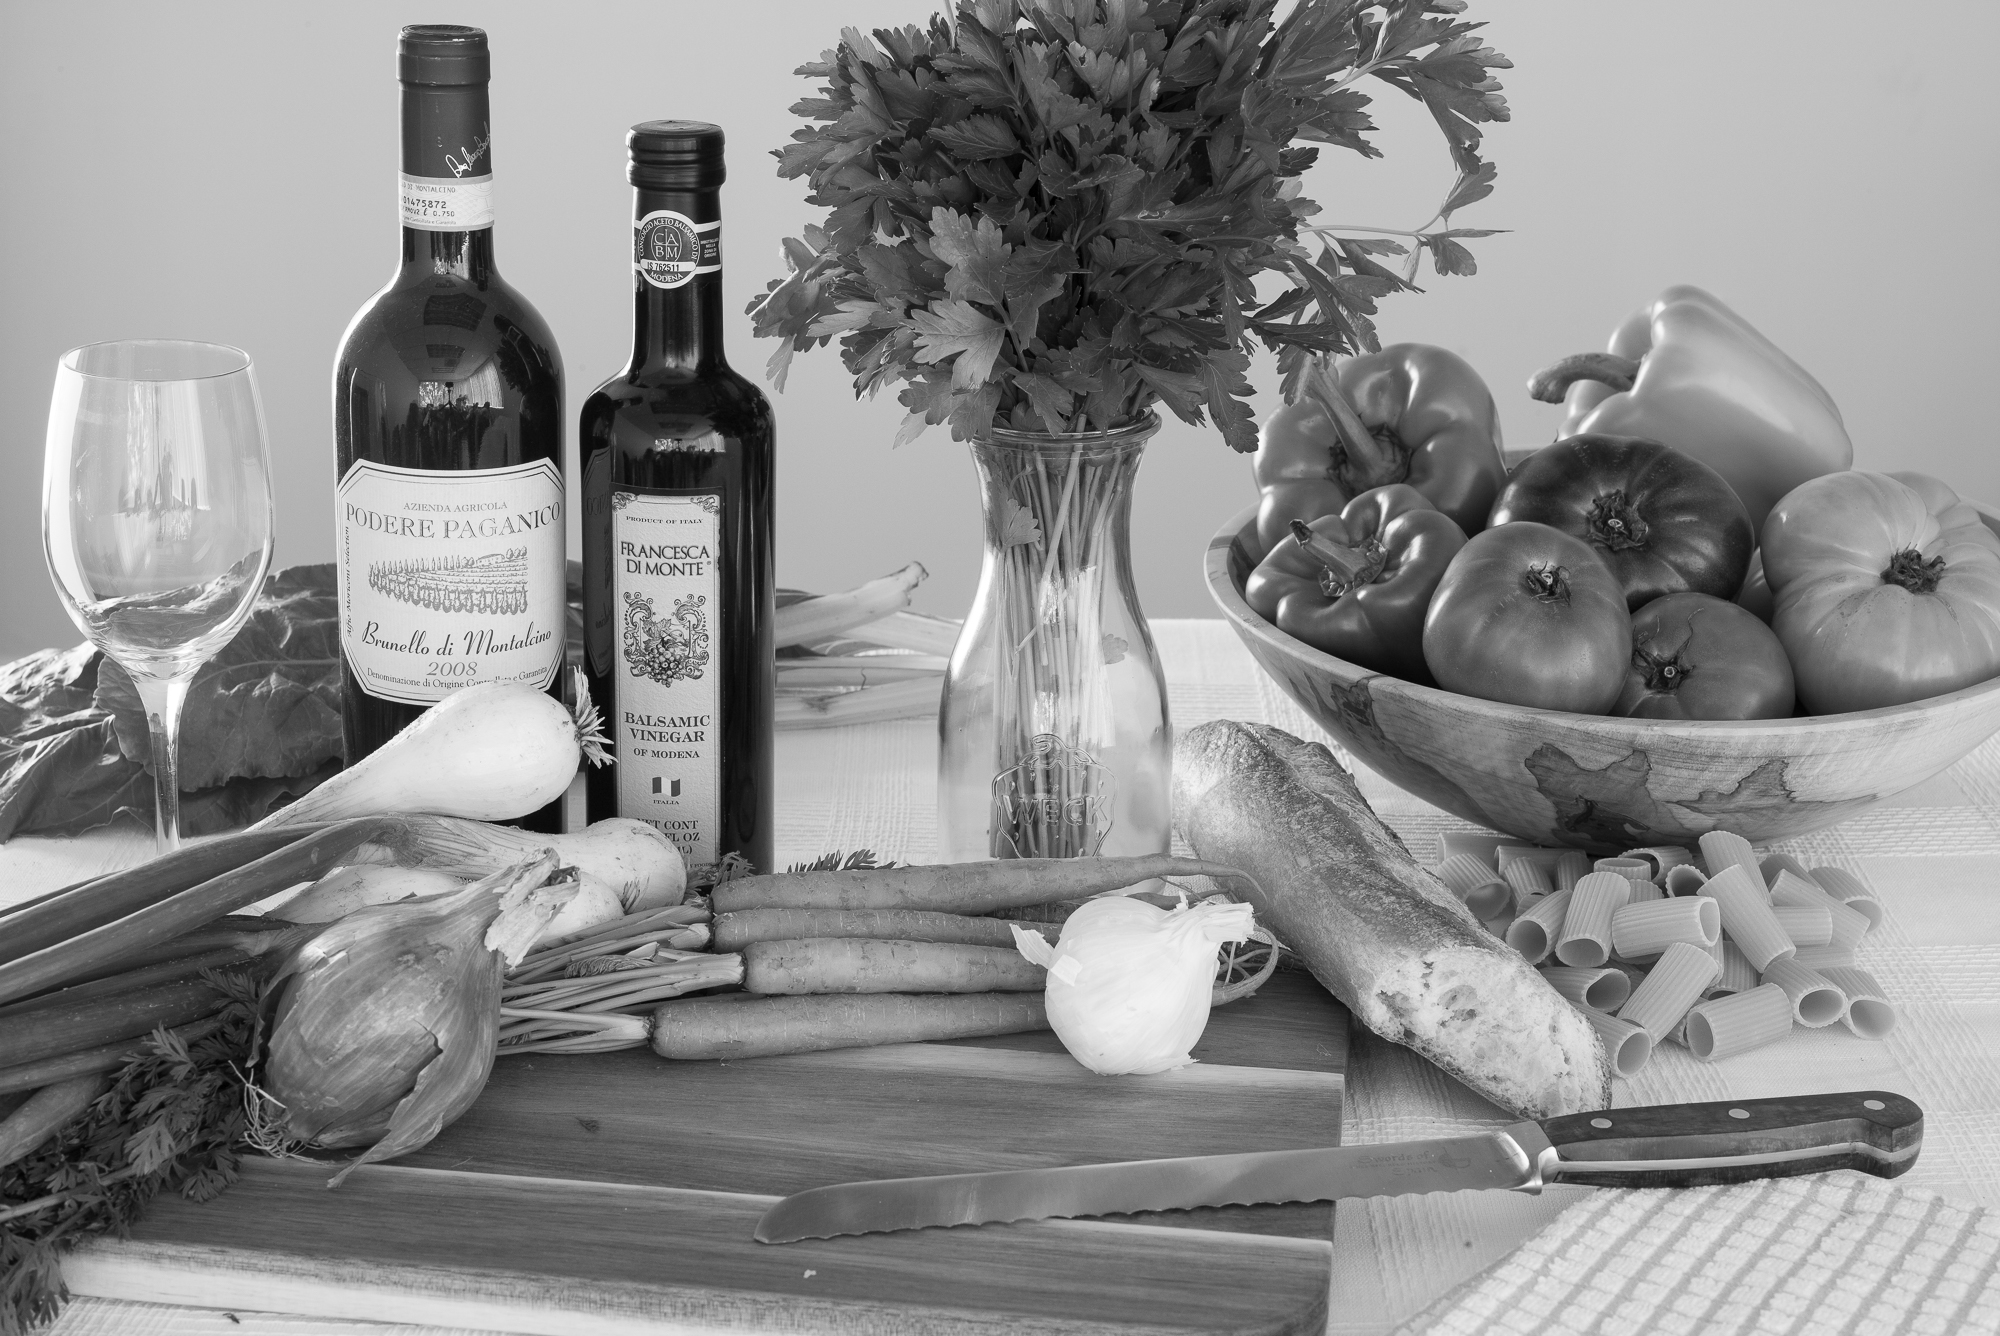
LEICA M (Typ 240) Full Image (B&W conversion)
I did notice a very slight shift lower on the M9M image after I was done shooting the test sequences. My guess is that the M9 RRS plate is a little shorter than the one for the M240/MM246. Both M24x cameras matched up almost identically. For our purposes, and considering the megapixel difference, this doesn't have any impact on the test.
M9 Monochrom Full Image
How to Properly View the Comparisons
One final note before we get into the comparisons: these images are output to 2000px on the long side, with 1:1 pixel rendering. Be sure to click on each crop set to view the larger image. When viewed with no onscreen scaling, one pixel on your monitor will display one pixel from the camera. This is complicated somewhat by Retina-type displays that do pixel resampling. Applications like latest versions of Photoshop and Lightroom have the option of running in non-scaled, 1:1 mode, but the pictures will appear smaller on screen. If your monitor resolution is less than 2000px across, like on an iPad or a laptop, be sure to right-click on the image and select Open link in new tab (be sure to select link not image). This will open just the image and you can view it at the correct size once you click to magnify. Or, even better, right-click to Save link as… and view in Photoshop. Unfortunately, with technological innovation comes its own set of challenges. Retina and 4K/5K displays look stunning, especially for text, but are sometimes less than ideal for image comparisons as they employ pixel doubling and no longer show 1:1.
The Comparisons
For our first comparison, let's take a look at all cameras at base ISO. I didn't bother using the PULL 100 setting on the M240 as this is actually worse quality-wise relative to ISO 200. Both Monochrom cameras have a base ISO of 320. Here we are looking at the peak quality offered by all three cameras. And, they are all quite excellent, especially using the 50mm APO.
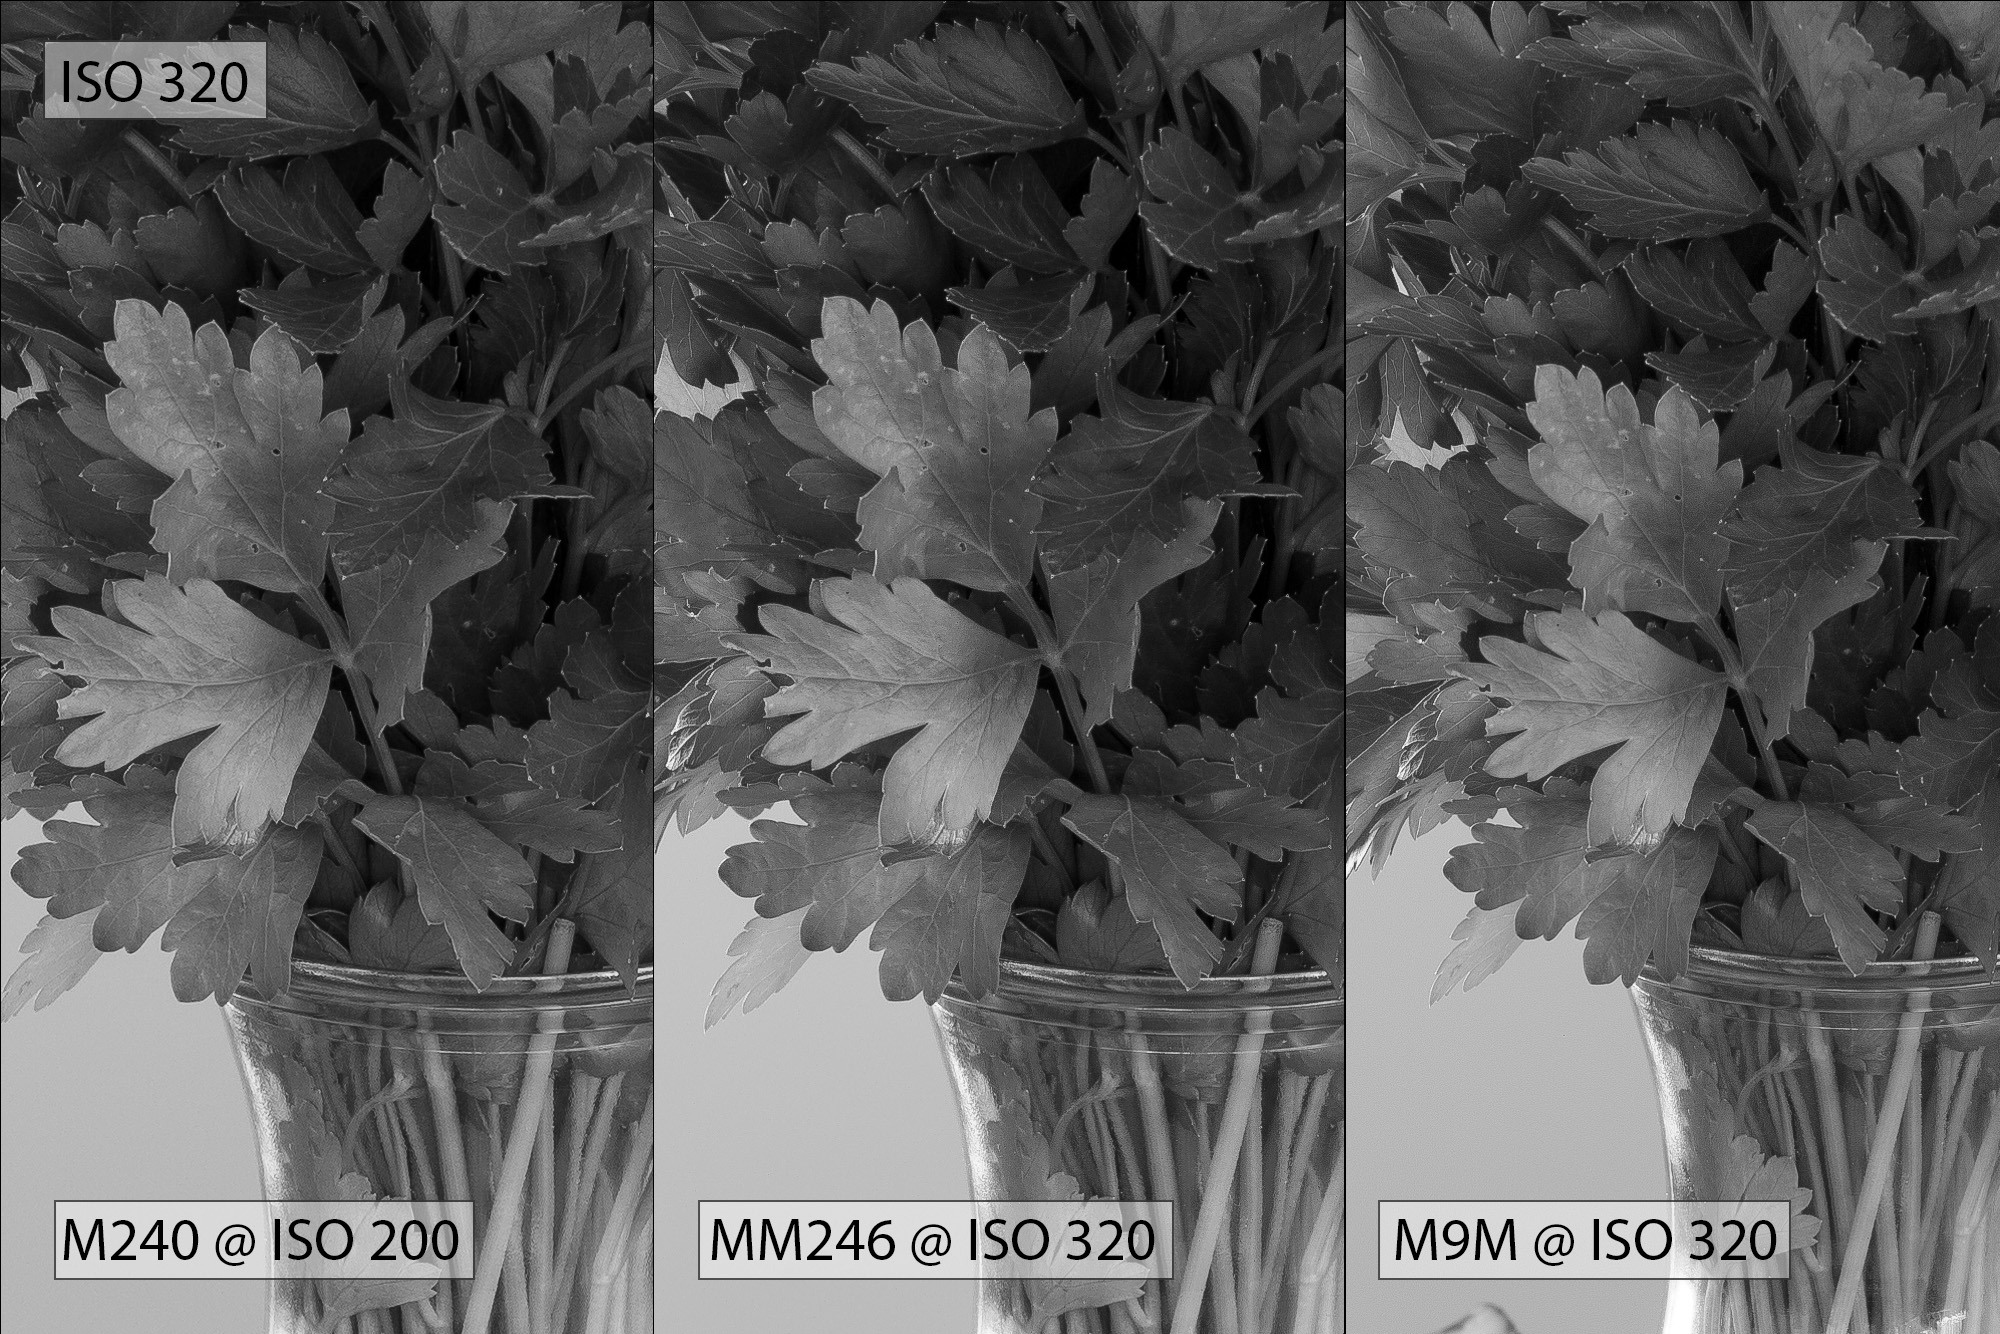

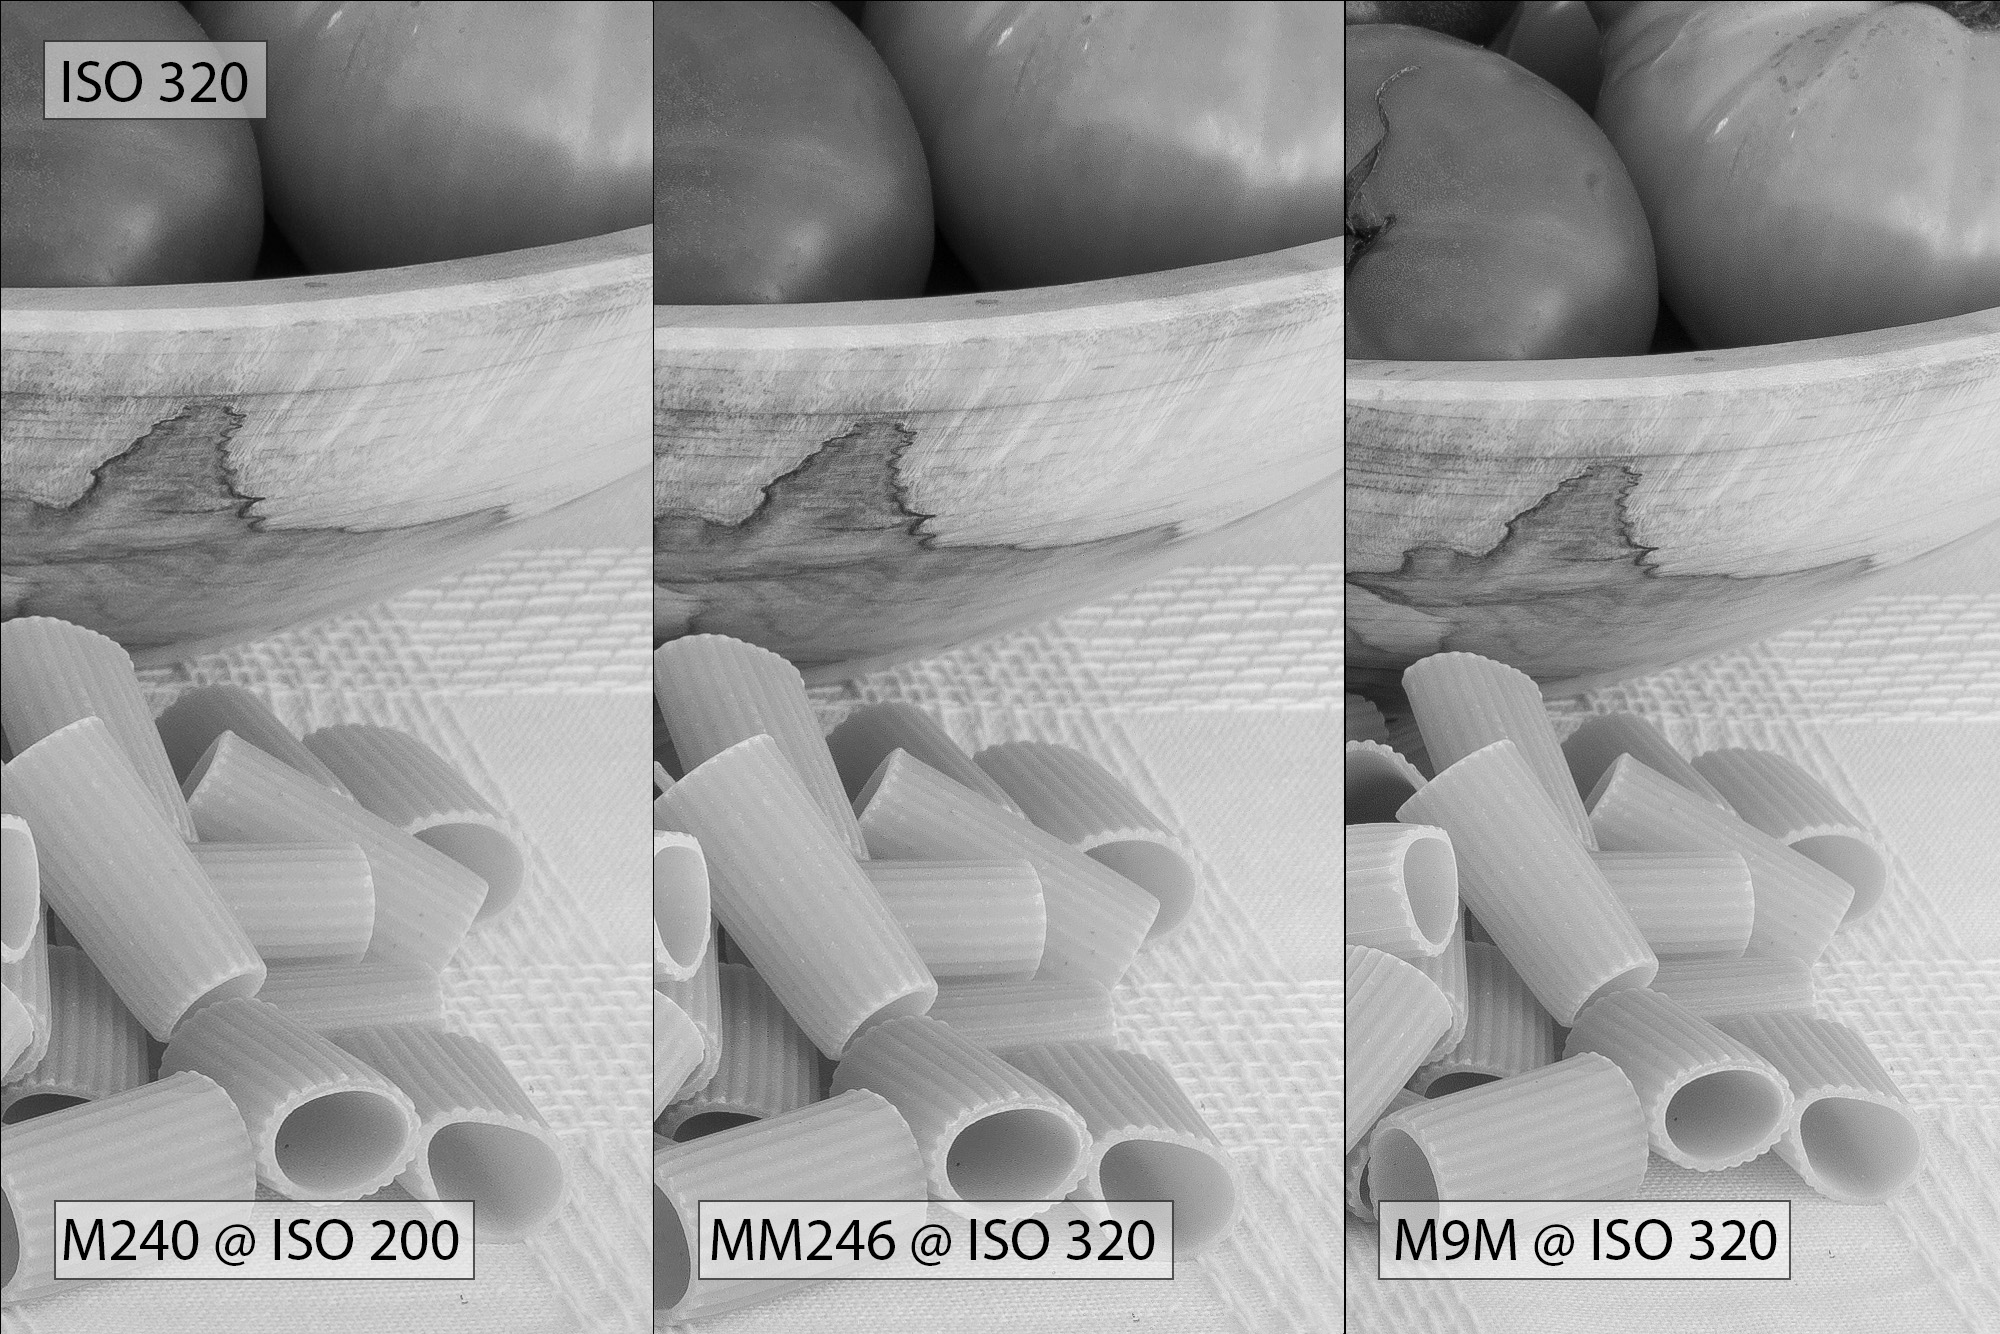
For the next set, all three cameras are all dialed in at ISO 320. Again, quality is exceptional, although you can see a little more detail in the MM246 relative to the M240 shot here. This behavior will continue all through the rest of the image comparisons, which is to be expected. The M9M, for its part, is turning out loads of detail, even though the MM246 is trumping it in terms of pixels.


ISO 640 tells the same story. All three cameras continue to turn out great quality, with the MM246 producing just a little better detail.

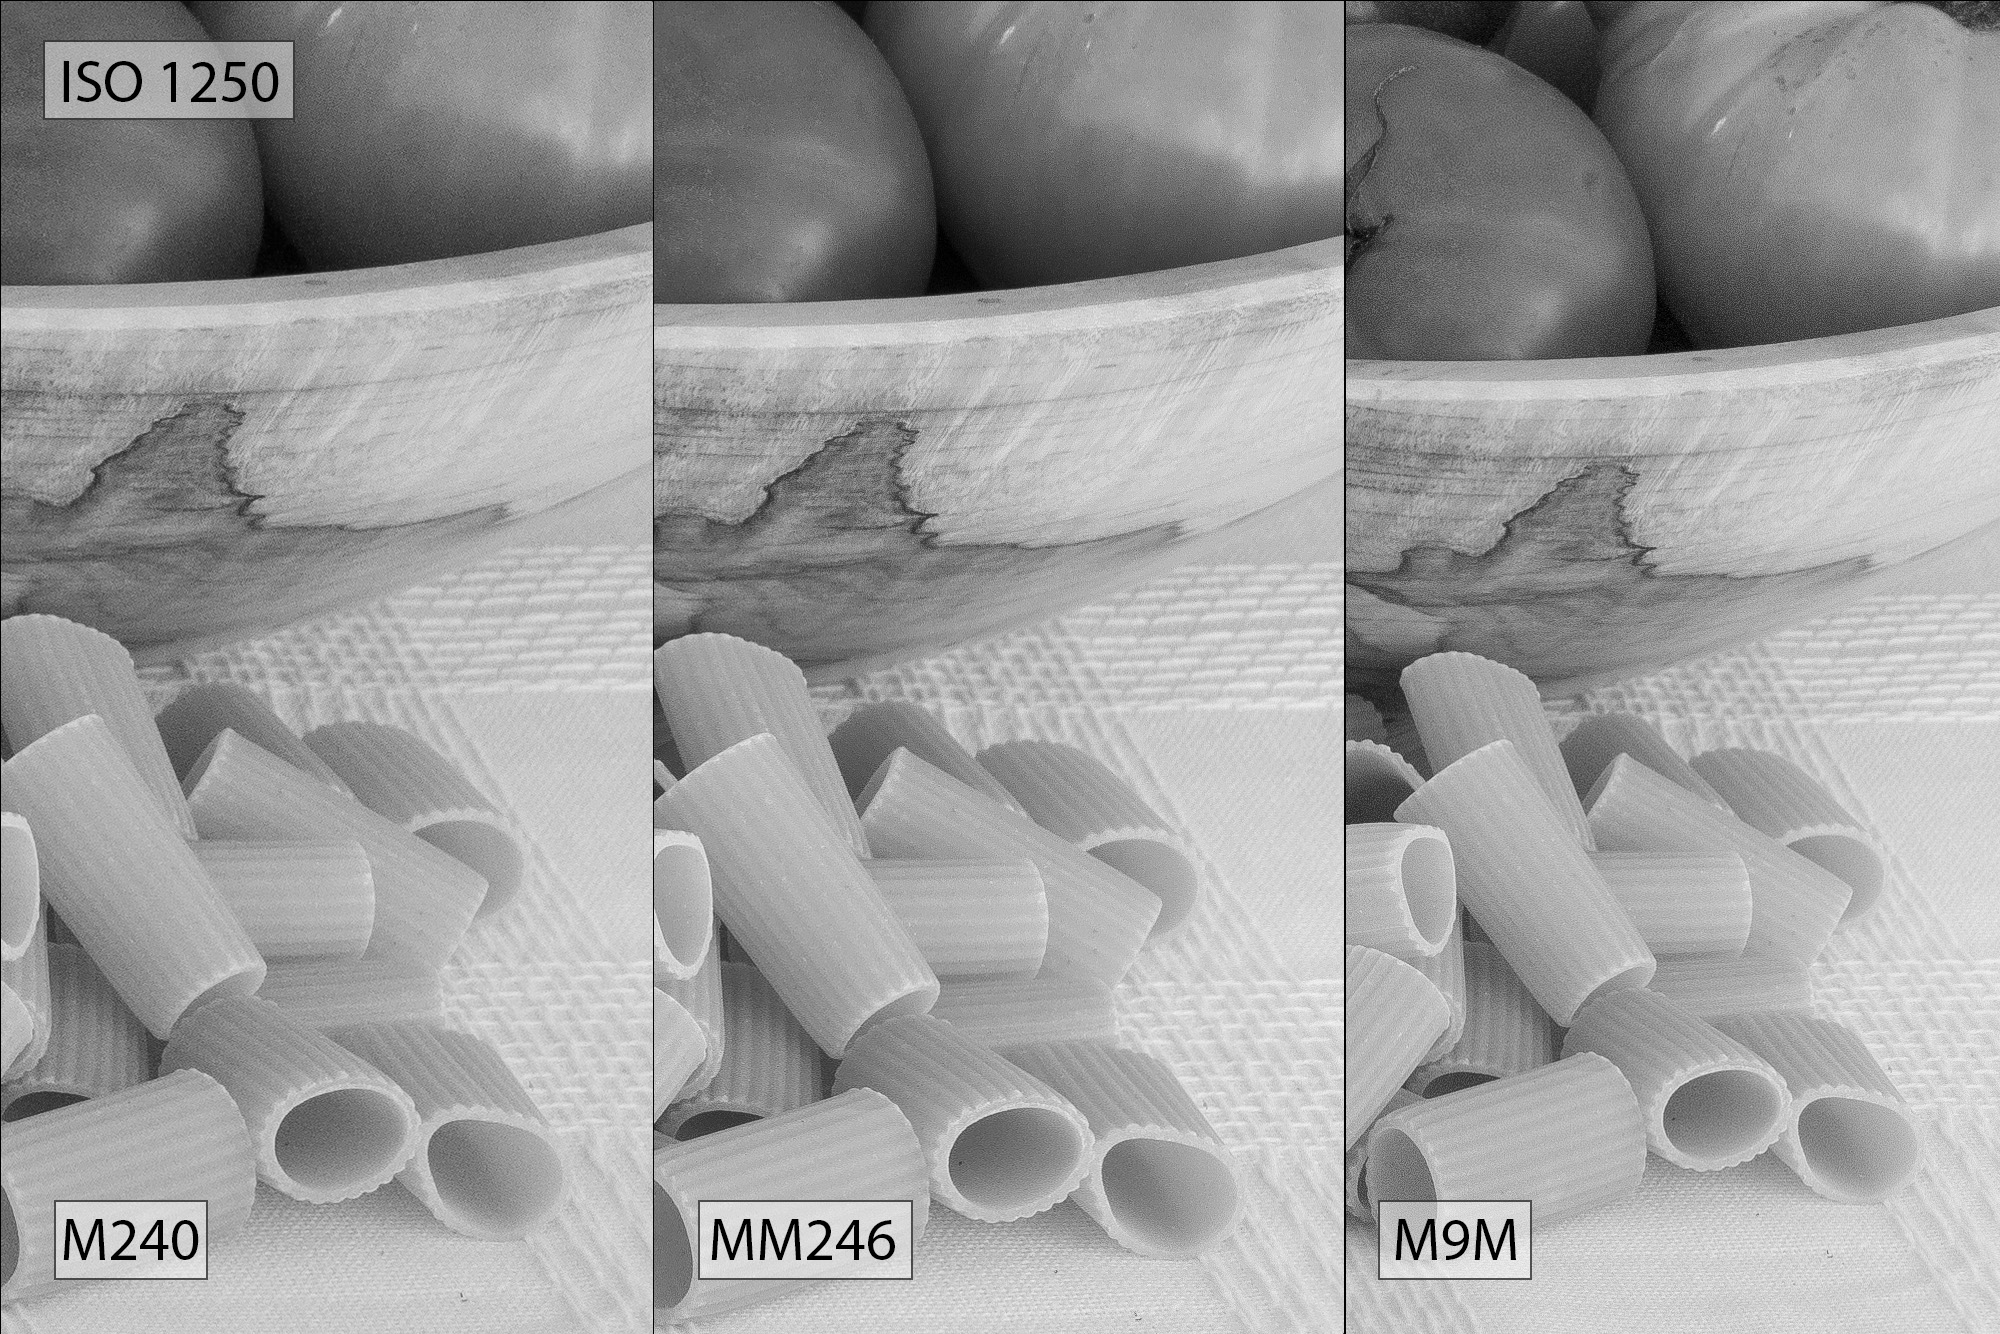
At ISO 1250 the MM246 is showing less noise and more detail, but the differences remain subtle.
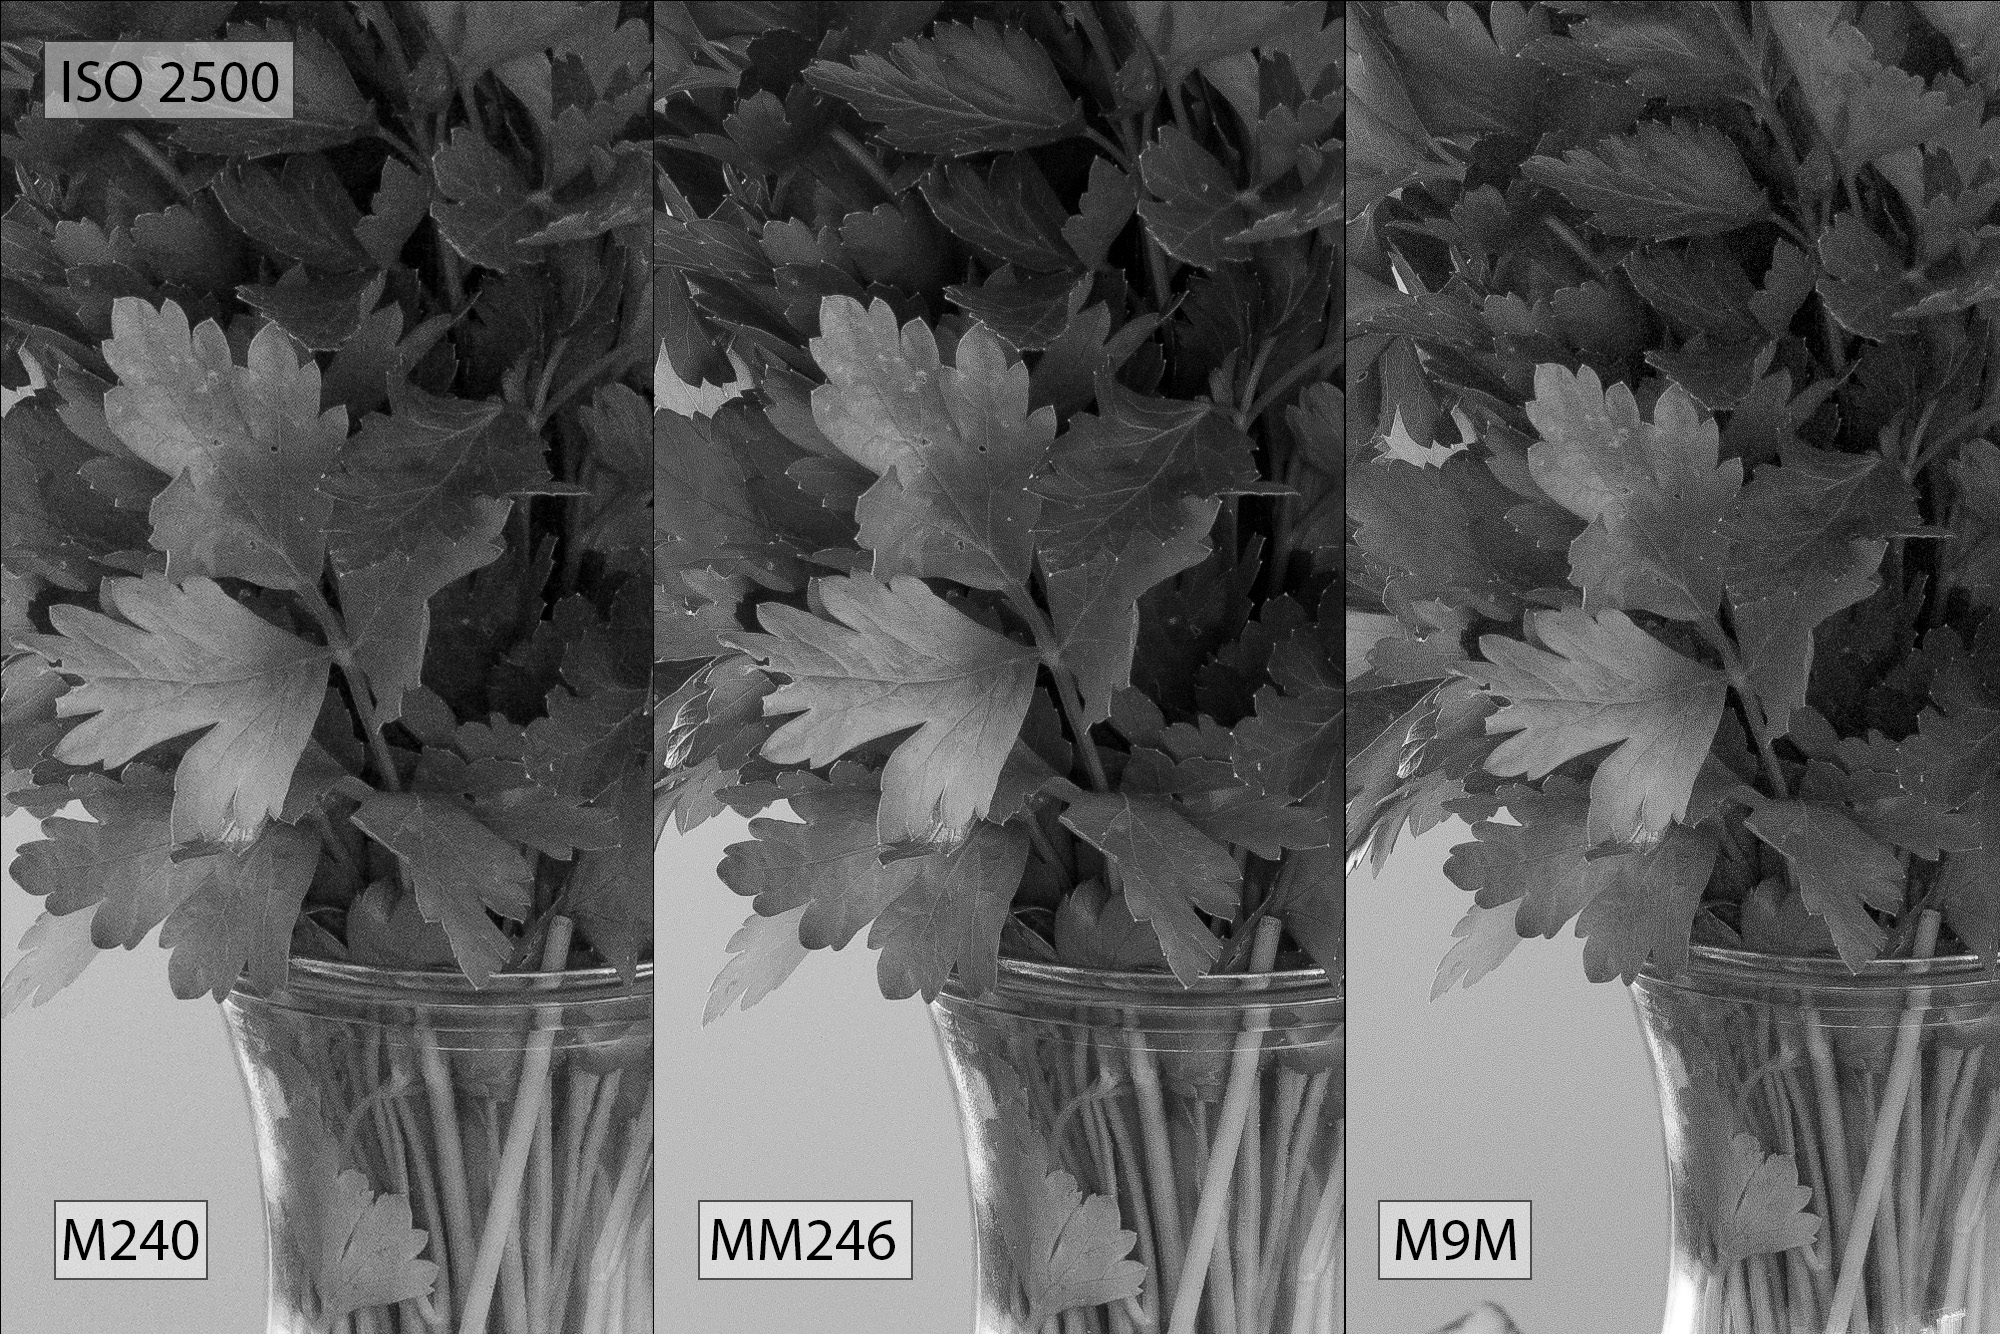
At ISO 2500, we're now seeing some real differences in the files. The M240 is losing a little tonal separation and the M9M is getting a little flat with light noise in the darker tones. The MM246 is both cleaner and more detailed, and holding more contrast.


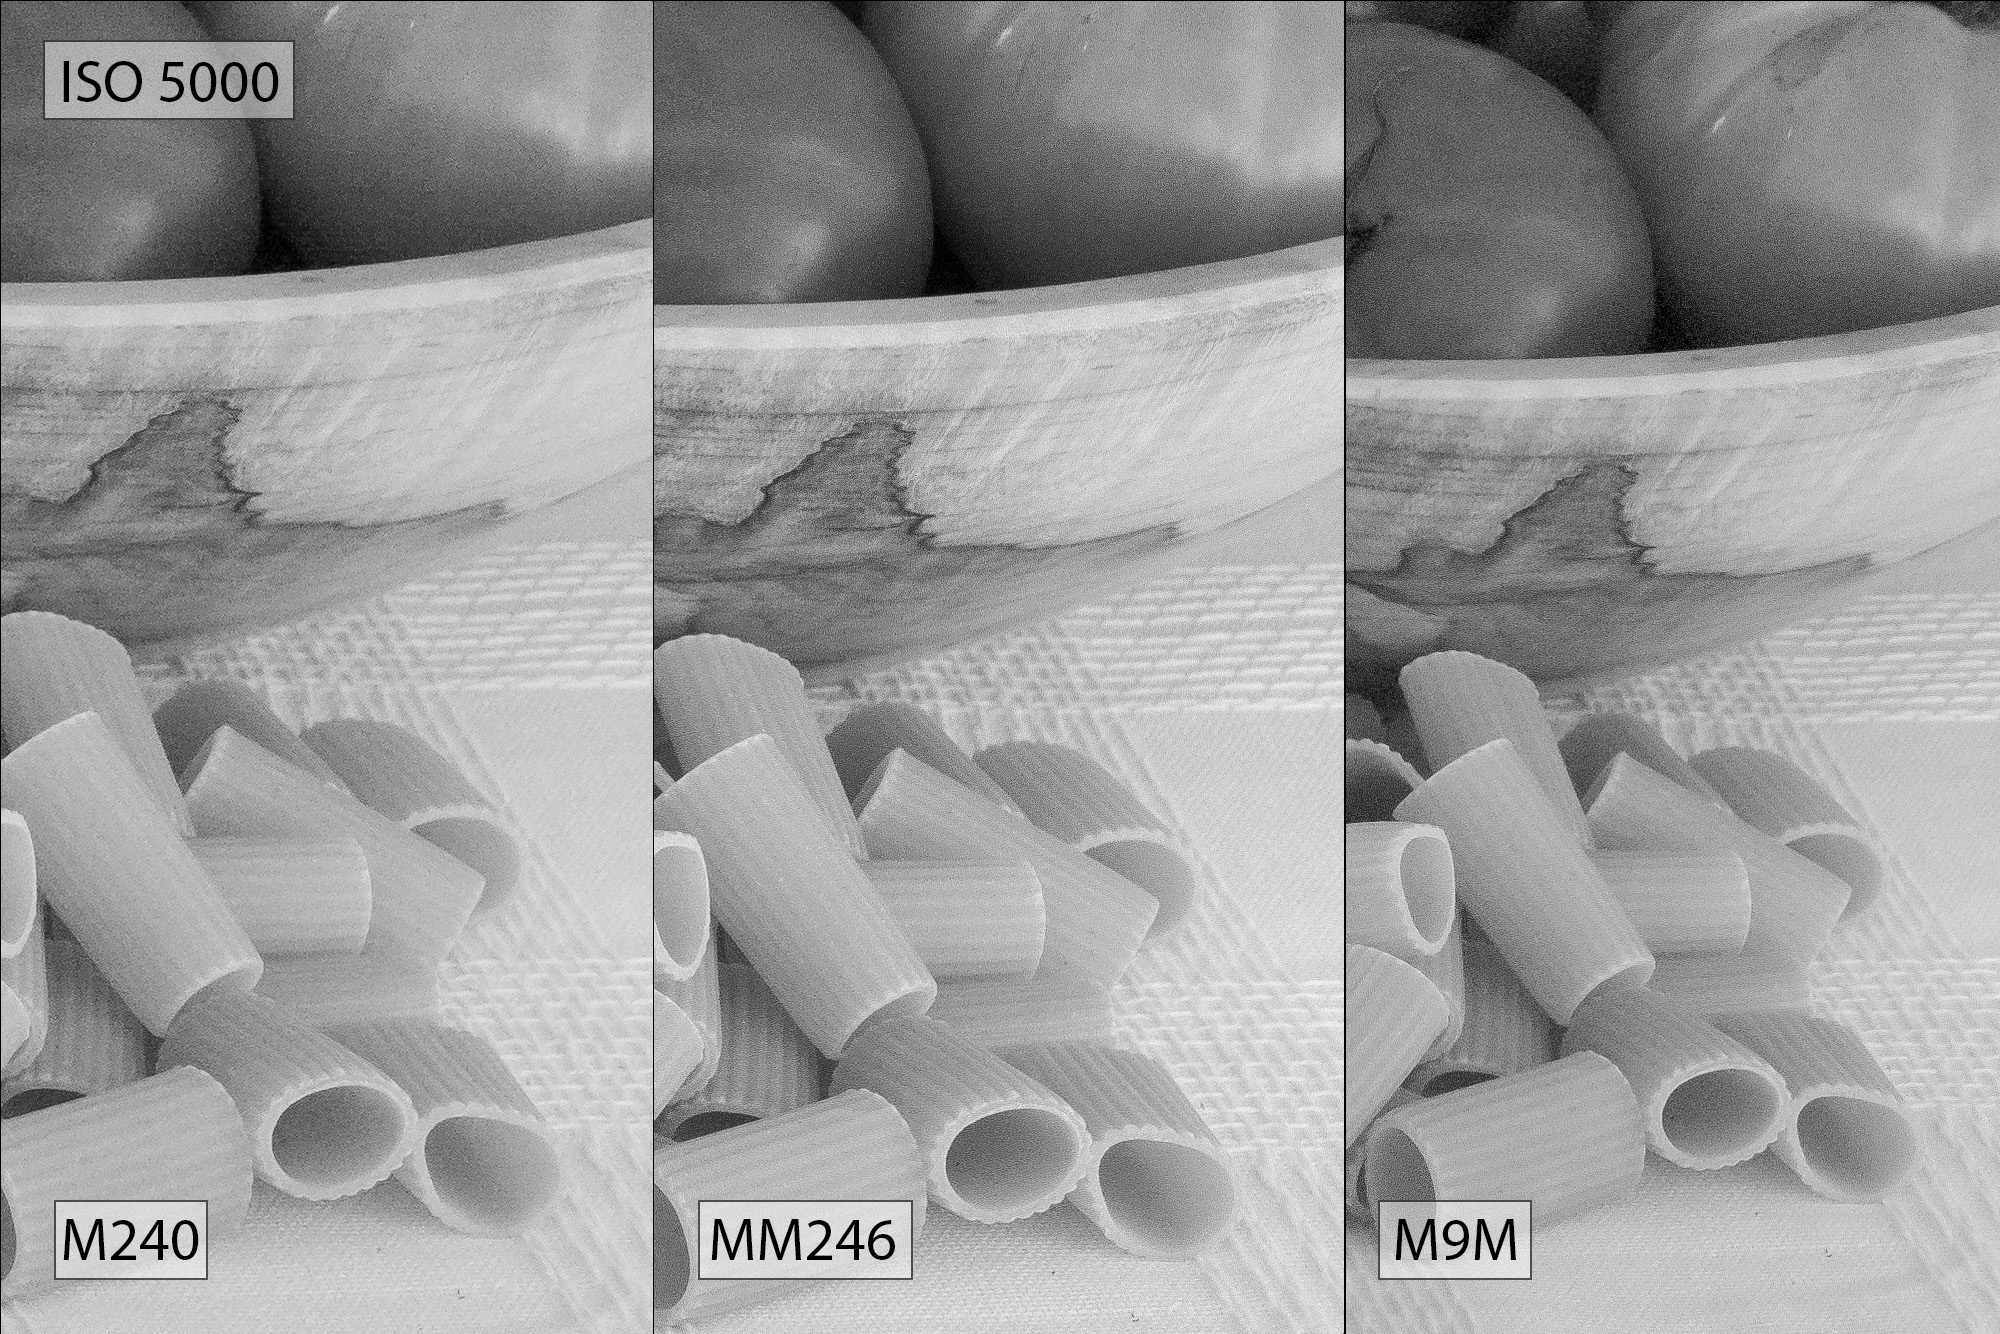
At ISO 5000, the MM246 is just starting to display some visible noise, but it isn't taking away from picture detail. Take a look a the tablecloth texture right in front of the pasta, as well as the parsley to see this. Both the M240 and M9M have a lot more noise, which is causing the images to flatten out.


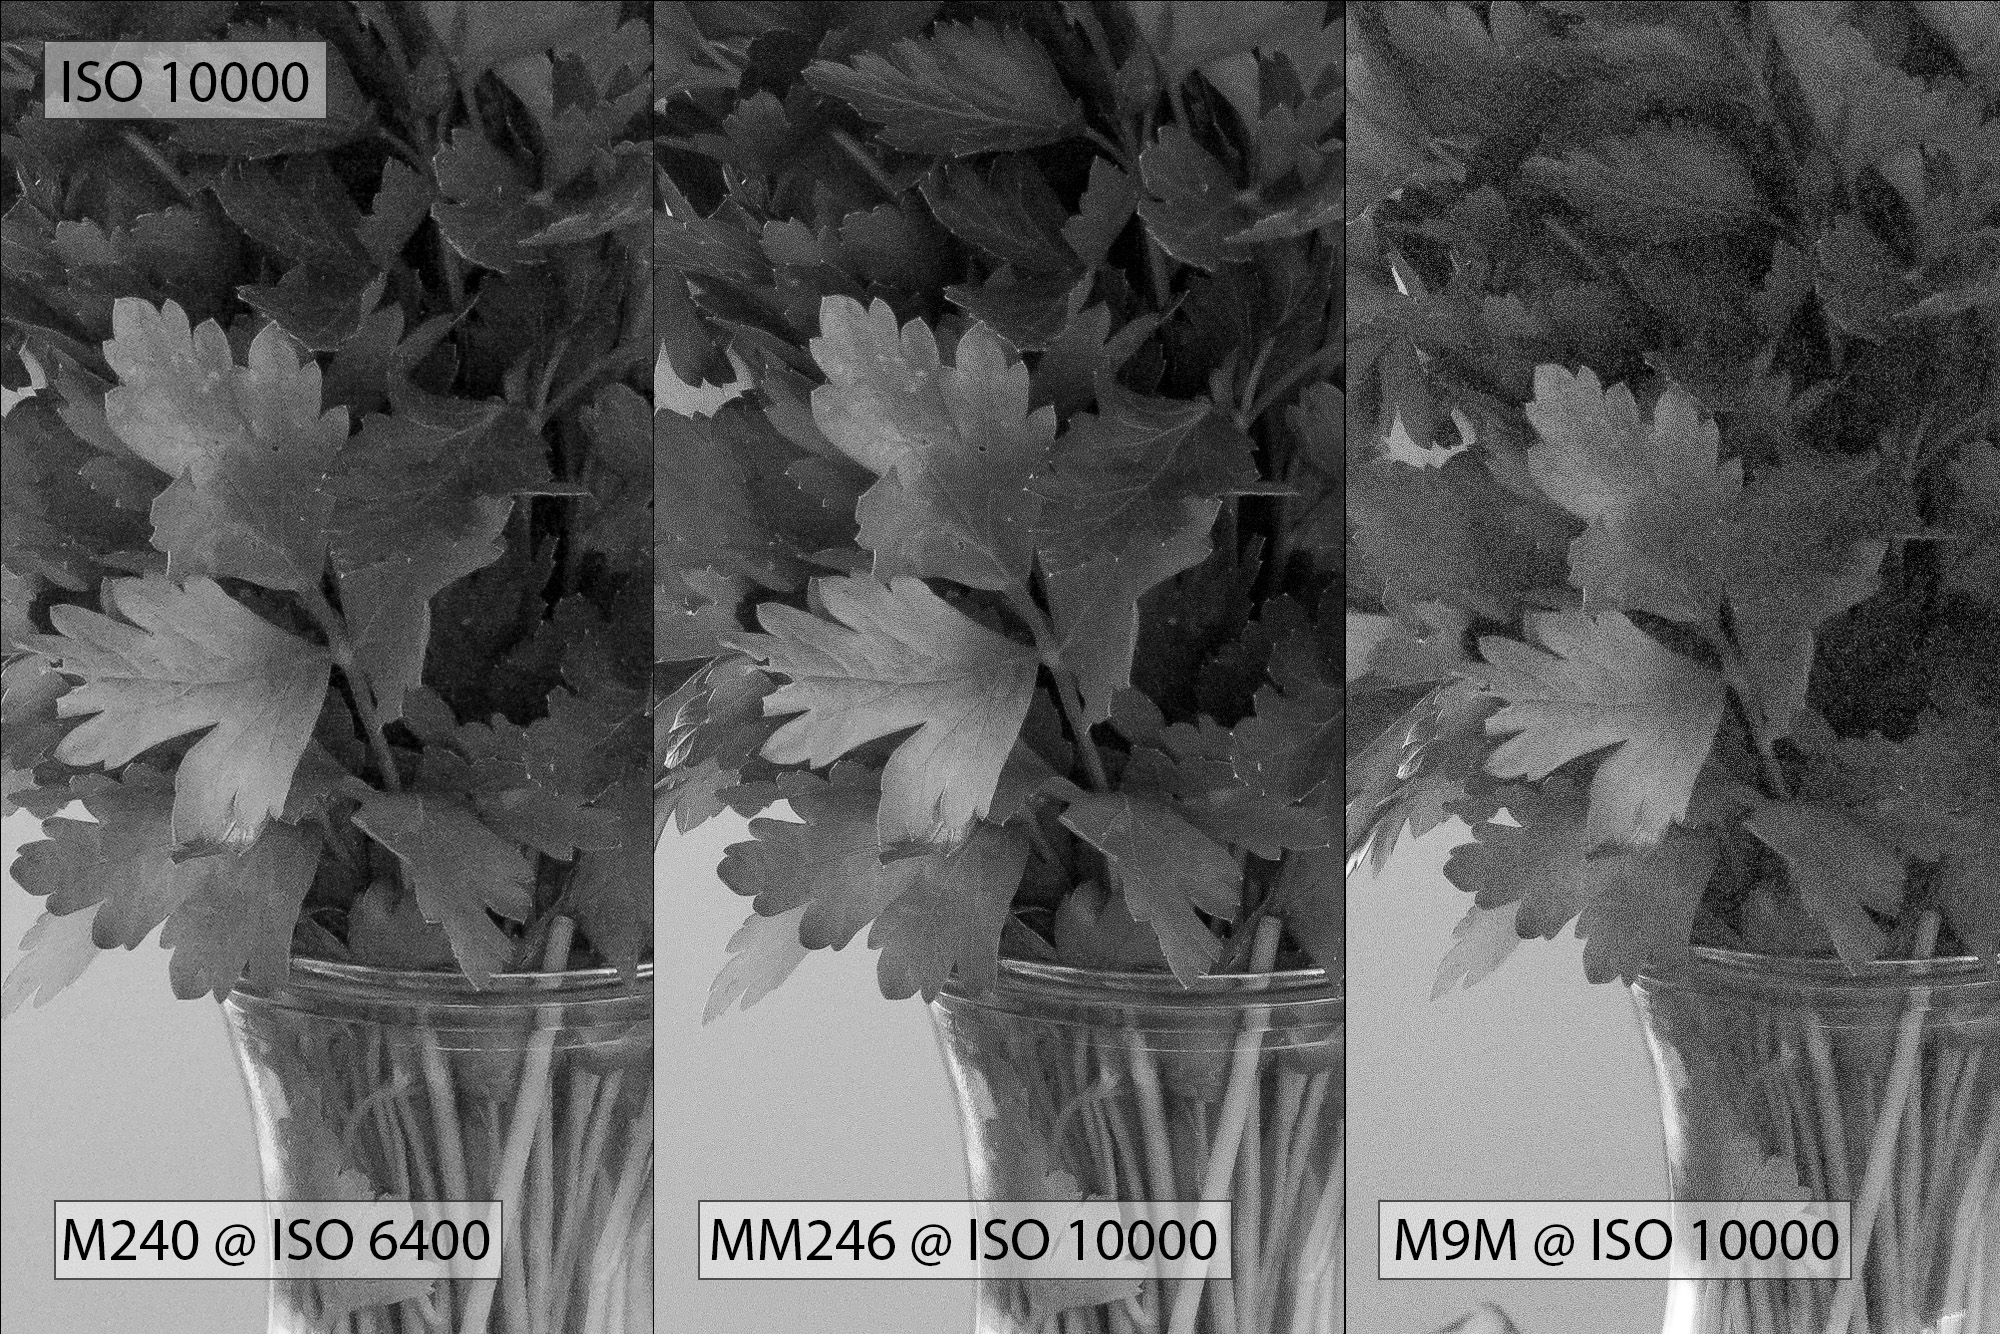
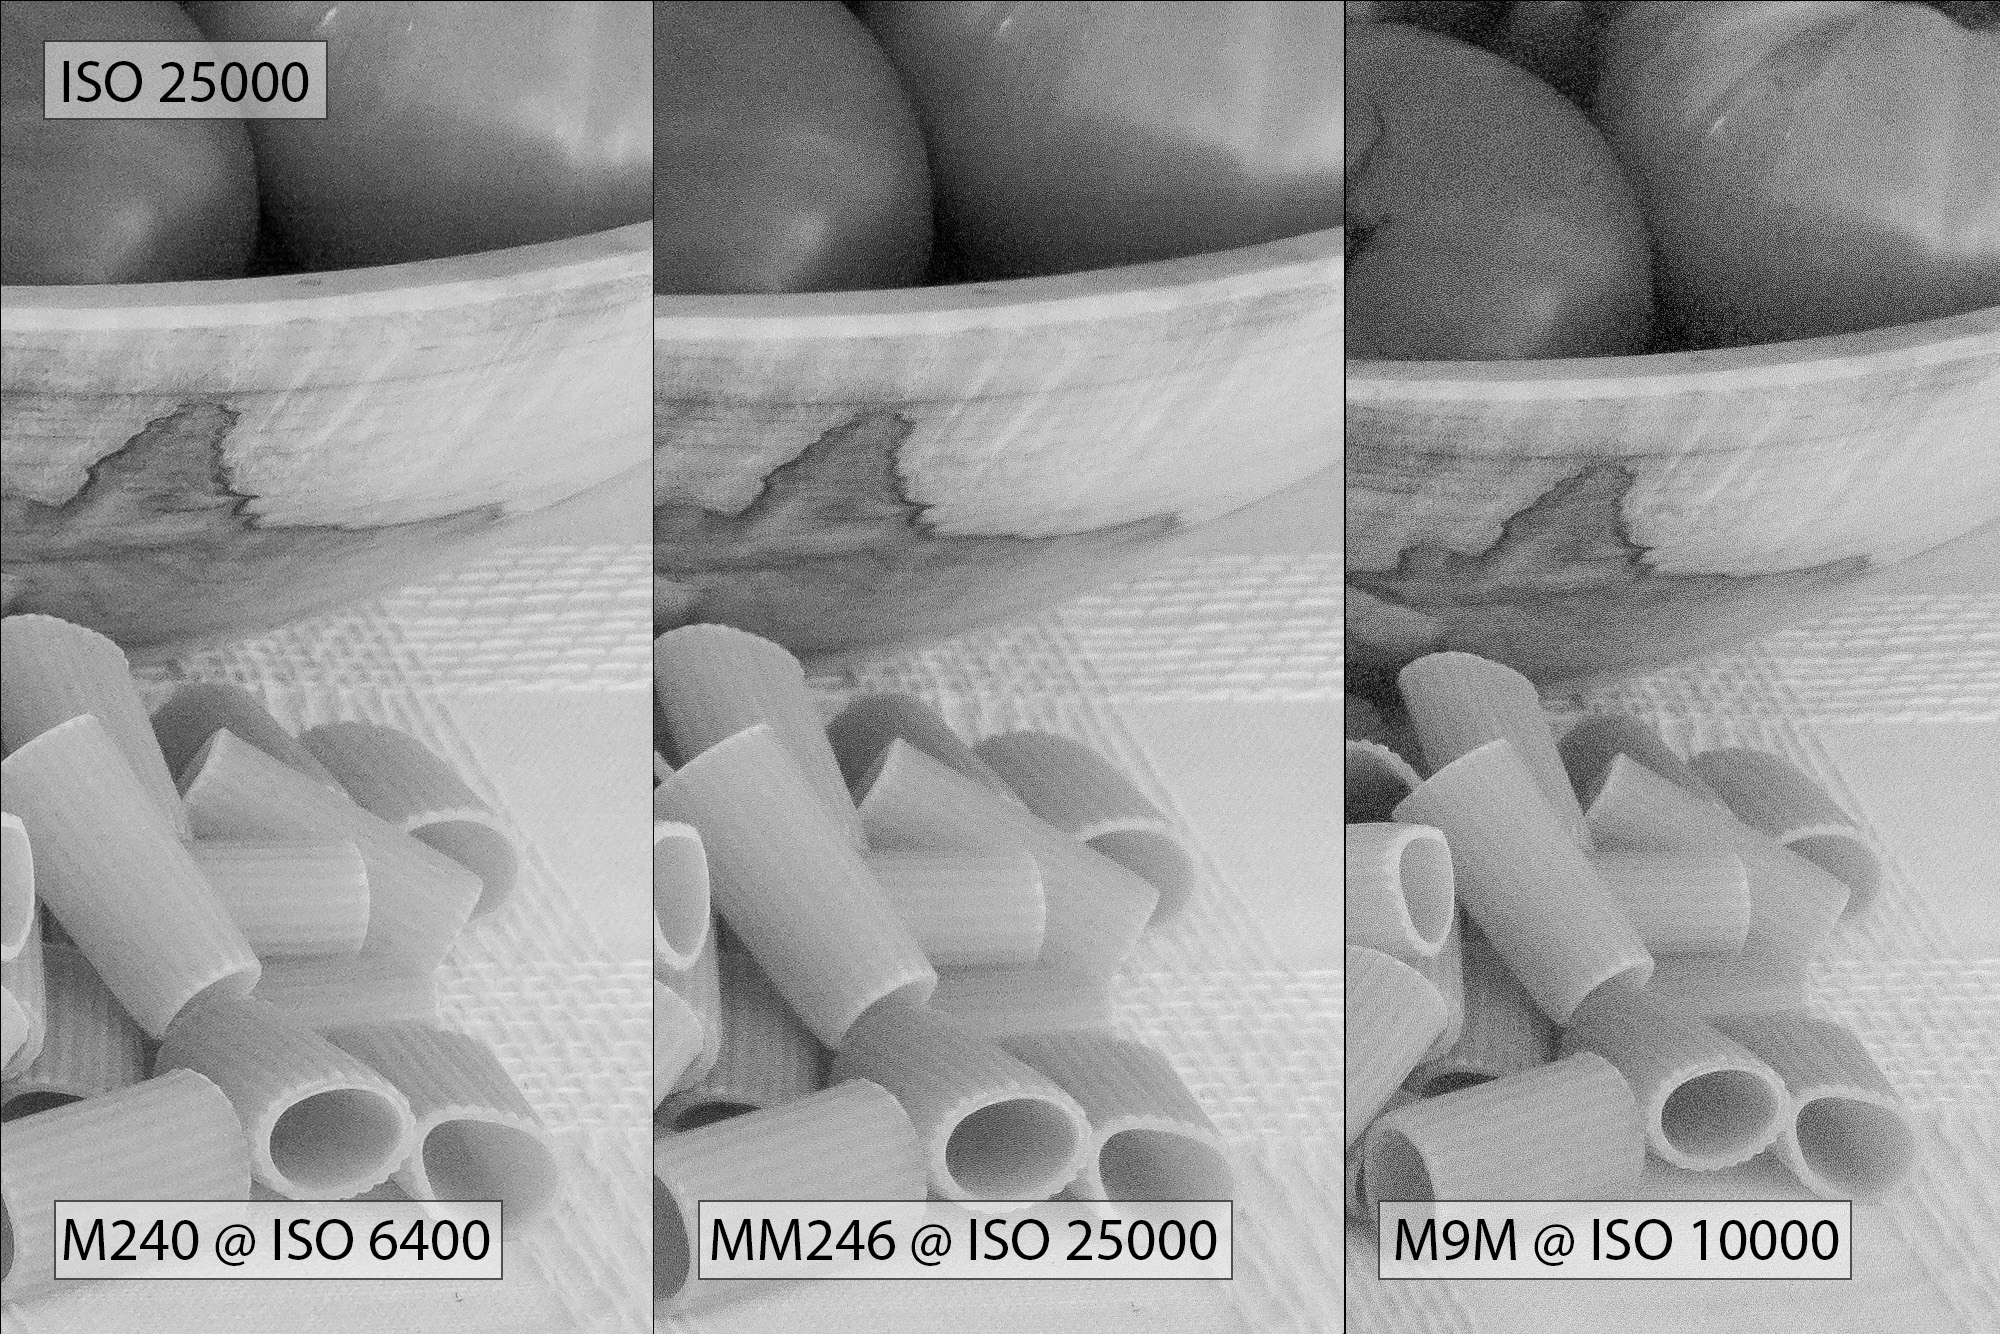
For the ISO 10000 image, remember that the M240 will only go up to ISO 6400, so that is what you see below. The 1/3 of a stop increase on the M240 doesn't look too much worse than it did at ISO 5000. This setting is certainly usable, especially when converting to B&W. The M9M doesn't fare quite so well at the top of its range, though. Even with considerable noise reduction and sharpening efforts on my part, the white speckled noise pattern overruns the image and gives an impression of haziness. On the M9M, I'd stick to ISO 5000 or 6400, but I'd have no qualms whatsoever using the MM246 at ISO 10000.
Only 1/3 of a stop higher than ISO 10000, ISO 12500 is significant only in that it is the top of the normal range of the MM246. Neither the M240 nor the M9M can go this high, so each is displayed with its respective highest setting of ISO 6400 and ISO 10000. Even though the MM246 is a a full stop higher than the M240 at ISO 6400, it still looks better here, as well as continuing to best the M9M at ISO 10000.

Finally, at ISO 25000, which is a PUSH setting on the MM246, the image shows some serious deterioration. It's worth noting though, that at ISO 25000, the MM246 still looks better than ISO 10000 on the M9M and only slightly worse than the M240 at ISO 6400.

Observations and Wrapping Up
So, there you have it. I fully expected that the MM246 would put up a good show. What I didn't account for was just how well the M240 fared in this experiment. When converted to B&W, it is actually not too far behind its B&W brother, the MM246, and matched up extremely well versus the M9M. I saw far more of a difference between the M9M and its color progenitor, the M9, when I originally tested them against one another. But as good as the M240 is, the MM246 is noticeably better for low light shooting and offers a much higher ISO range, as well as crisper files throughout the entire range.
To its credit, the M9M, while no longer the high ISO champ, still outputs amazingly sharp images with a great look. And even though a little more noise was creeping in starting around ISO 2500, the noise pattern of the M9M is a little more film-like than that of the M240 and has less image smearing. It is only when getting right up to ISO 10000 that things take a serious turn for the worse for the original M Monochrom. I can attest to having no shortage of nice looking images in real world shooting up to ISO 6400, but it's clear that the latest M Monochrom offers about two stops better performance with a resolution bump to boot.
The new Leica M Monochrom (Typ 246) was the clear victor here, but the deck was stacked heavily in its favor. Its CMOS sensor handles noise better than the CCD found in the M9M and with no color filter array (CFA), the Monochrom was guaranteed to outperform the M240 using the same sensor with a CFA.
The bottom line is this: I had no complaints with using ISO 8000, 10000, and 12500 in my real world shooting while working on my review of the MM246. This test just reinforces my confidence in this amazing camera.
Great test and interesting results. As you said, the M 240 seems to be holding its own to a certain extent.
As a possible M 246 prospectee, what are your thoughts behind opting for an M-P 240 vs the Monochrom?
As a possible first time M buyer (although I own some leica glass), I am incredibly attracted to the new Monochrom since I do a LOT of b/w conversions to my images. Of course, since conversion means having access to colour, the flexibility of having both options is nice to have (and I have grown used to it).
Besides the fact that the monochrom resolves better and has better high ISO quality, how DIFFERENT and how much BETTER is the mono capture of this (and the previous monochrom)? (Since in your test, the b/w conversion of the M 240 looks incredibly close to the Monochrom capture).
Can you quantify a bit where the monochrom shines in b/w photography over a conversion perhaps?
what does any of this have to do with actually taking pictures. these tests are such a waste of time. who cares. just go and shoot. i never understood people who spend so much time benchmarking ISO and DOF, etc. Just spend more time shooting and less time analyzing.
While controlled ISO testing like this doesn’t directly impact “taking pictures” per se, it does let users or potential users understand the performance envelope of this camera vs. other cameras. I suppose the same argument could be made as to why car reviewers measure 0-60 times and lateral acceleration, among other benchmarks. They are a good measure of relative performance. Personally, I do prefer going out and shooting actual pictures. If you read my Leica M Monochrom (Typ 246) Review, you’ll see I have no shortage of real-life pictures taken in a variety of situations.
@d.p. you’re a Moron. If I’m spending $8k I want to see the differences in output. Especially if it’s a specific camera like the monochrome. If you don’t like it, don’t read it. Maybe you should spend more time taking photos than complaining.
Having shot extensively with both the CMOS and the CCD sensors MM246+M9M I must say that the CCD presents the ‘Leica Look’ a lot better than the CMOS. Yes, in pure measurable performance the 246 wins hands down, but send me out to shoot some B&W ‘Leica’ images then give me the M9M anytime. 🙂
I know this article is old but I just re-read it after you linked to it in the release of the M10M.
It’s an interesting article because for me it does 2 things:
1. Confirm the benefits of the monochrome sensor with its additional light gathering capability and subsequently much better high ISO performance.
2. Does nothing to confirm, and in many ways disproves, the additional “resolution” offered by the monochrome sensor. After downloading and inspection, the results between all three look near enough identical to me in terms of resolution/micro-contrast in real world usage. I see nothing like a “1.5 to 2X equivalent resolution boost” in the monochrome images.
So then, isn’t the real conclusion that if you aren’t shooting at high ISO you’re better off sticking with a camera that can also shoot color?
I think there’s a lot of confirmation bias going on in these types of reviews when they aren’t blind… And if you are going to sell monochrome cameras by stating there is an increase in resolution offered by a monochrome camera, actually produce some results that demonstrate this?
Such a thought-provoking article! I found it very informative.
I just sold my M10 Monochrom. Why? Two main reasons:
1) I rarely used it at anything above 3200, therefor I couldn’t justify owning it. Yes, it felt great knowing I could take photos at super high ISO, but I found myself testing it only, but in practical terms I only used it in a evening photoshoot where most of my photos were 3200 or below.
2) It’s too expensive a camera to be carrying around in the area where I live. My M240 WITH the red dot, I can roam the streets without fear of being out $8K. It is brassed as hell, battery life lasts me at least one whole day of shooting, and it feels great carrying it around.
The M240 black and white JPEGs are great SOOC, the Film simulation is exceptionally nice. The M240/M262 are the pinnacle of digital Ms in my opinion, I know I’m going to get hate replies for saying this. I’ve used all digital M’s. In second place I would say the M8, great colors, then the M9. Output from the M10 and M11 is too bland and modern for me. Maybe we’ll see something magical in the M12, or are we now going down the megapixel road?