
While I had the Leica M Monochrom for testing in Germany, I figured I'd do a quick semi-controlled ISO test compared to my M9. I had certain impressions of relative ISO performance during my review of the M Monochrom, but nothing beats a side-by-side test. Before we get into the comparisons, let me first explain my methodology.
Testing methodology
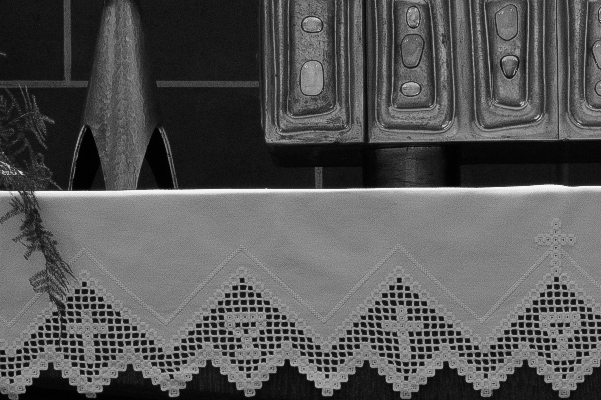
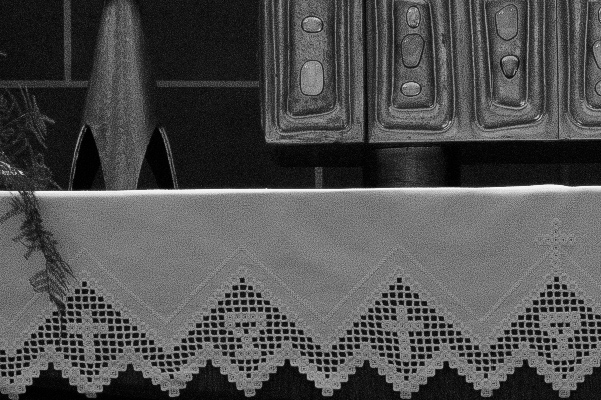
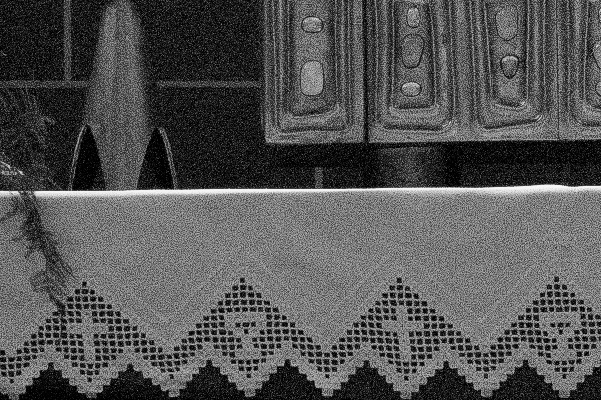
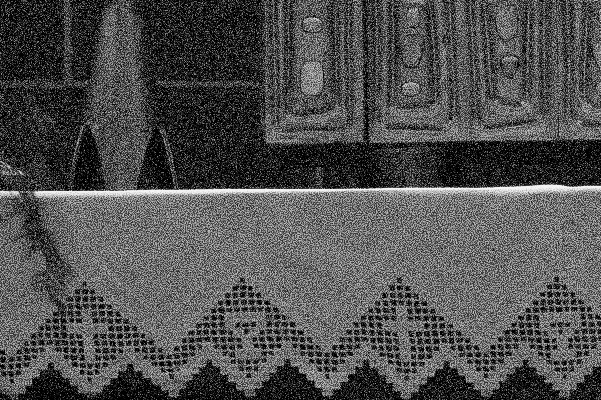
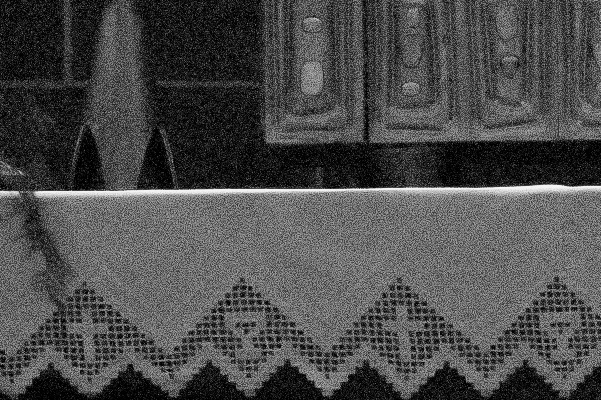
These images were taken in the Wetzlarer Dom while I waited for the rain to subside. I shot them sequentially using the same lens: the Leica APO-Summicron 50mm ASPH using the same aperture (f/5.6) and same focus point. Between camera tests, I swapped the bottom plate while still mounted on the tripod so there would be as little movement as possible. Exposure was carried out using aperture priority. The light didn't change inside the church (overcast and rainy outside) and theoretically both cameras have the exact same meter. My intention was to shoot as quickly as possible and run through the entire ISO range so there would be no change while testing. Ultimately, the exposures did remain consistent.
Post processing approach
Both the M Monochrom and M9 images were processed in LR4 with all images of the same camera receiving identical settings. The M Monochrom images and the M9 were processed slightly differently due to necessity (one is natively B&W, the other is not). Here, my intention was to match the M9 as closely as possible to the M Monochrom result in terms of B&W conversion. Did they match exactly? No. I think the M Monochrom still gave superior B&W images even with tweaking the M9, but I suppose this was to be expected.
I did apply sharpening to the files on both cameras, with the same settings for both. These are the settings I would normally use on either the M9 or the M Monochrom. I feel it is best to compare fully processed images that have been made to look as close to finished files as possible. I know that other testers use “out-of-camera” images with “nothing applied”, but I never quite understood this approach. Post processing is part of the normal workflow and, in my opinion, shouldn't be separated from the camera for testing purposes. It's sort of like track testing two cars with their tires removed (so as to not give any traction advantage). I want to see what my actual results will be when I shoot these cameras in a real-world situation, and in the real world I would never not process the files to my taste.
That said, I turned off all noise reduction on both cameras, with the exception of the ISO 5000 and 10000 tests of the M Monochrom. Here, I provided images with no NR applied and with minimal NR as I might apply based on subject matter.
To compare the images, you can drag the center slider handle left and right, single-click in the area you want to split the image, or just use click the text controls underneath. In all images up to 2500 ISO, the M9 is on the left and the M Monochrom is on the right. For 5000 and 10000, only M Monchrom images are shown, with the noise reduced version on the right. All samples are at 100% size (1 pixel on screen = 1 pixel from camera). Enjoy!
ISO 320


ISO 640


ISO 1250


ISO 2500


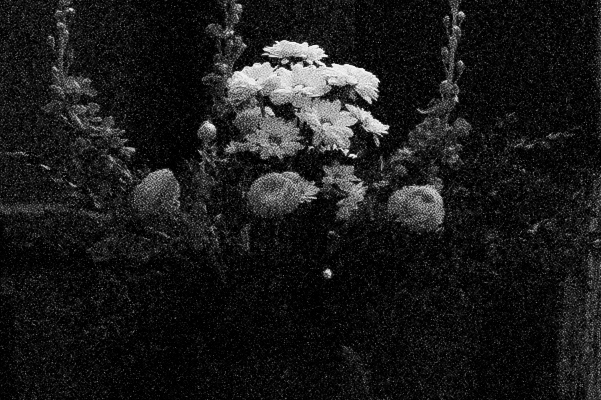
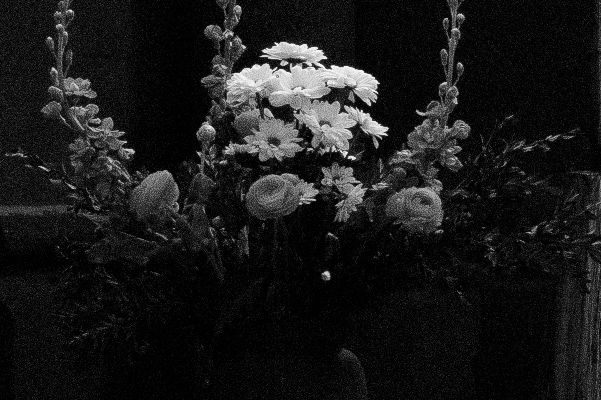
Because the M9 tops out at ISO 2500, the last two are M Monochrom only. As I mentioned in my full review, I think that noise reduction is only advisable after ISO 3200. I generally prefer to have more detail rather than totally smooth files.
ISO 5000
Here, I think noise reduction could be useful, but it's not necessary. On the left: no noise reduction. On the right: Luminance NR set to 20. For ISO 5000 and 6400, a little NR goes a long way.

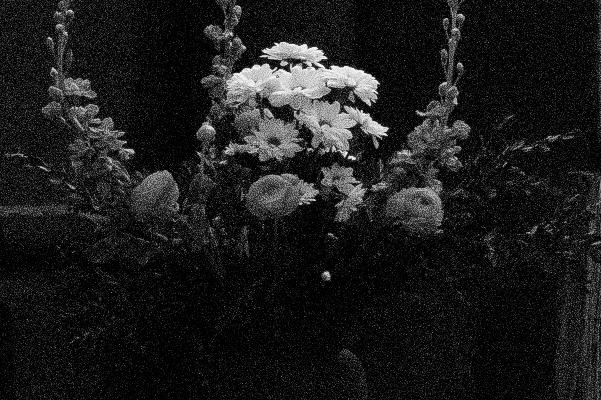

ISO 10000
At ISO 10000, NR is going to to be needed in order to avoid bright speckle noise. Here, I used a Luminance NR amount of 25. You can see how the blacks clean up very nicely just with a bit of NR. The tight, non-blurred noise pattern of the M Monochrom makes this easy.


If you think the Leica M Monochrom or 50mm APO-Summicron could be for you, consider placing a pre-order through Dale Photo & Digital. Dale Photo is one of the largest and most knowledgeable Leica dealers in the USA. No deposit or prepayment is necessary. Call 1-800-327-1776 with any questions, or email me at [EMAIL=david@dalephotoanddigital.com]david@dalephotoanddigital.com[/EMAIL].
The slider on the images is a cool effect for showing the differences as move the slider. Well done.
Oh, I am glad to see that ISO 10,000 on the MM is useable with a little NR. It is no worse than what I remember TriX film being at ISO 400. You can see a little bit of blurring in the flowers, but all in all, not bad, especially for a ccd sensor.
Incredible. The texture pattern of the MM images mimics so closely the grain of film…something I miss. Yes, special effects software can add this in post, but in my limited experience with those programs, the results were always a bit fake. Now it seems we have the real digital equivalent.
Geoffrey
The sliders are so cool! 🙂 Thanks David.
What about converting m9 into BW? There is so many ways to do it, what did you use?
Serg,
As stated in the article, I used LR4 to convert to B&W. I used the channel mixer sliders to get as close as possible to the M Monochrom’s look.
David,
Fantastic review as always and the sliders are the icing on the cake! The monochrom will prove to be a fantastic imager in the right hands. I look forward to seeing the results from those that use it to its’ potential!
channel mixer
– now clear. thx!
David,
Thanks for doing this!
–I wouldn’t turn off NR on any M9 workflow, so the results are not surprising in terms of noise
–It’s clear that the M9 files are using less green channel info than the MM’s green sensitivity, which is also going to create a noisier M9 shot (um, if those leaves are green 🙂 They are noticeably brighter in the MM rendition )
–this is a backwards test to me in terms of tonality: why not make the best monochrome tonal rendition you can from the M9 *then* see if the MM can match it in post?
Jamie Roberts
Jamie,
I actually covered a lot of the color channel noise in my main M Monochrom review. My main point for matching the M9 to the M Monochrom was that the color sensitivity of the MM is fixed, while the M9 is not. Also, my intention was to test for base level noise at equivalent ISOs, not to see which could be made to look a certain way. While I agree with you that I would normally use NR on higher ISO M9 images, the point was to try to establish a comparison point. I suppose another way to look at is that with NR required/applied to an M9 file at 2500, the MM with no NR will still have less noise and more detail.
Hope that clarifies.
excellent test. Congratulations.
Hi Davis,
Your test is excellent.
But this M9MM is expensive. To some one for long time using negative film, such investment needs serious reflection.
I ‘m certain, your next Test _if possible_ in term of tonality between M9MM vs. Negative film ( on M6, M2, M4 …) would be greatly welcome.
Thank you.
are you guys blind?
the pattern resembles a dirty cheap digital algorithm seen in jpg compression artifacts.
there’s nothing analogue on the monochrome leica, definitely the pattern on the M9 is more random and more beautiful – as in analogue it is random too.. as on iso 640 you can already see the algorithm with your bare eyes.
makes retouching impossible. sorry.
This is just my opinion, but I work in Film/ VFX and photography Industry for almost 10 yrs. and I’ve been doing a lot of de-graining and re-graining and grading aswell as roto and retouching work.
Leica Fail.
ps. also the grain looks ugly.
Canon or Nikon is much more capable of nice grain (can’t believe I say that – though I shoot Leica too).
I don’t really see what you are seeing. To my eyes, the MM has the same grain pattern as the M9 two stops lower. 1250 on the MM looks close to 320 on the M9. I can’t see the ‘cheapness’ you refer to.
Apart, that is, from the MM vertical banding on the white cloth, clearly visible at 1250 ISO but progressively worse, thereafter.
– the image of the sleeping boy is so goloegusry! do you think 1000 iso will be enough? i know so many dark churches but i really can understand you. it’s another feeling to have this small camera (i only know the analog leicas but i think there is no big difference). i even think i’ll make other pictures with this i don’t know. maybe test it with m6. but i’m not really interested in technique, so: great work!
– I’m not sure if I’m more envious of the fact that you shot such beiautful people or that you got to hold a Leica M9. Either way, I love your work. Great job.
[…] Red Dot Forum has this ISO test, Leica M Monochrom vs. Leica M9. In a nutshell: the M Monochrom is so amazingly much cleaner. Well it tops out at ISO 10,000. Still. M10 hopes, here I come! […]